
Grow Your Email List: Connect Formspree to Mailchimp
Send form signups to a Mailchimp Audience with Formspree's no-code plugin, or use a webhook to update subscribers, split Audiences, and trigger Customer Journeys.
Once a signup lands in a Mailchimp Audience, your welcome sequences, segments, and tag-based automations can reach it. This article covers two ways to make that happen: Formspree’s native Mailchimp plugin for a single Audience with no code, and a webhook-driven handler for when signups need to update existing subscribers, split across Audiences by a form field, or trigger a Mailchimp Customer Journey. The form HTML stays the same in both approaches.
Why route signups through Formspree instead of Mailchimp’s embed
Mailchimp’s embedded form comes with Mailchimp’s styles. Matching it to your site means overriding their CSS, and you’re limited to the fields the embed exposes.
With Formspree, the form stays plain HTML you control. The same markup can feed Mailchimp today and Kit or Klaviyo later. You change the plugin in the dashboard, not the form.
One submission can also go several places. The same signup can add the subscriber to Mailchimp, post to Slack, and add a row in Google Sheets. Each plugin runs on Formspree’s side, so your form doesn’t need to know how many destinations exist.
Formspree stores every submission in the dashboard regardless of what happens downstream. If Mailchimp is down, the lead is still in Formspree, ready to re-add once Mailchimp is back up.
The form
Both approaches use the same HTML (if you want a styled starting point, see our Mailchimp signup form template): a lead-capture form with fields the Mailchimp plugin recognizes:
  <form action="https://formspree.io/f/YOUR_FORM_ID" method="POST">
    <input type="text" name="_gotcha" style="display:none" />
    <input type="hidden" name="tags" value="landing-page,q3-launch" />

    <label>
      Email address
      <input type="email" name="email" required />
    </label>

    <label>
      First name
      <input type="text" name="firstName" />
    </label>

    <label>
      Last name
      <input type="text" name="lastName" />
    </label>

    <label>
      Company
      <input type="text" name="COMPANY" />
    </label>

    <label>
      <input type="checkbox" name="_optin" />
      Yes, subscribe me to the newsletter.
    </label>

    <button type="submit">Subscribe</button>
  </form>
The _gotcha honeypot catches bots that fill in every field. The hidden tags field records where the signup came from, which helps when the same form is on your landing page, pricing page, and blog footer. The _optin checkbox decides whether the submission reaches Mailchimp at all, which matters for GDPR-compliant flows.
Field names matter. email is the only required field. The plugin picks up everything else by matching names, so the names you choose decide what lands in Mailchimp.
Beginner setup: the Mailchimp plugin
Formspree’s Mailchimp plugin is available on the Professional and Business plans. Setup takes two steps: connect Mailchimp, then pick the target Audience.
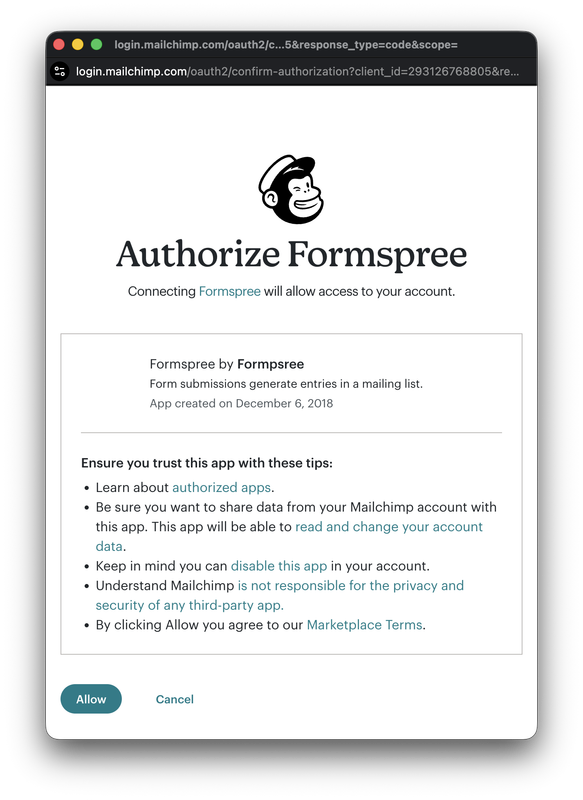
Open your form in the Formspree dashboard, go to the Workflow tab, click + Add New, and select the Mailchimp plugin. Formspree opens a Mailchimp login window. Sign in and grant access.
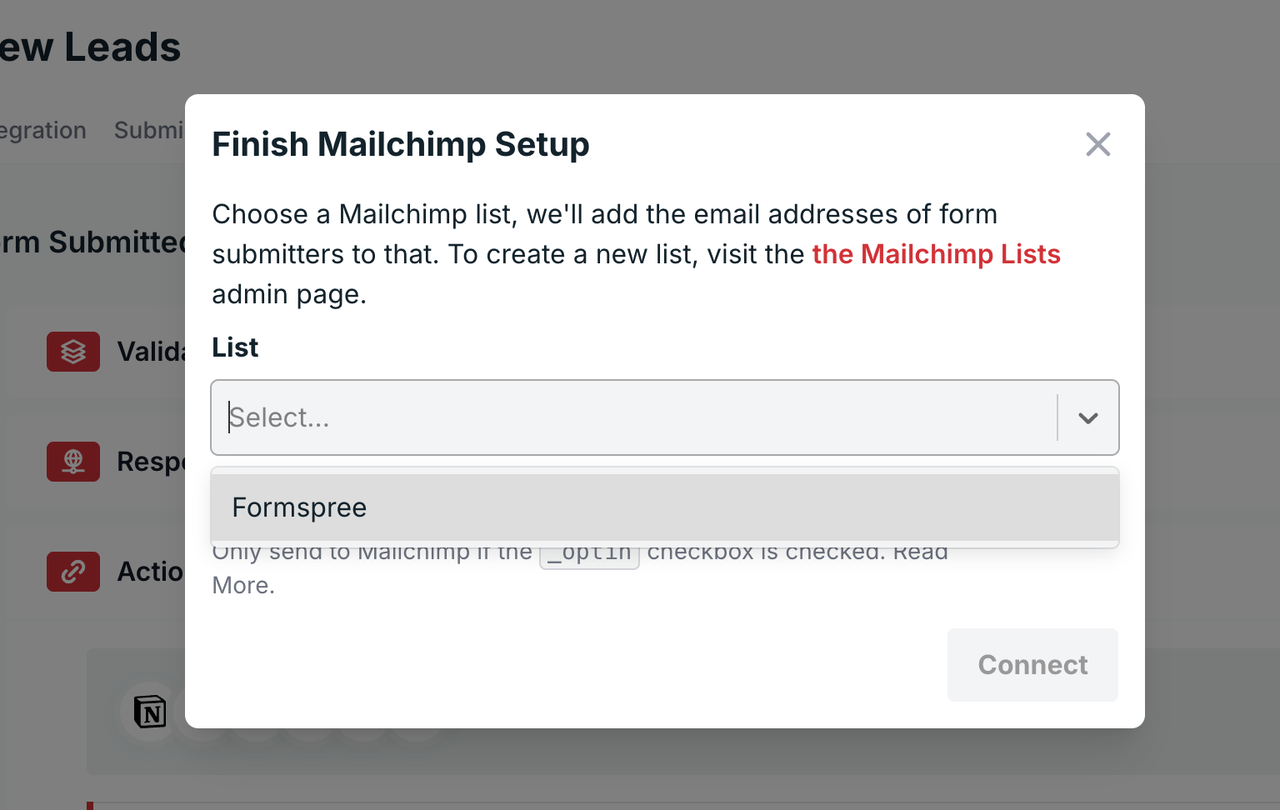
After you sign in, Formspree lists every Audience on the connected account. Pick the one that should receive submissions from this form and click Connect. If your form uses _optin, turn on Opt-in Checkbox here too.
The plugin recognizes several standard field names:
emailbecomes the subscriber address. This is the only required field.namesets both first and last name. UsefirstNameandlastNameinstead to set them separately.phoneandaddressmap to their standard Mailchimp merge tags.tagsaccepts a comma-separated list of tag names. Formspree adds aformspreetag to every subscriber.groupadds the subscriber to a Mailchimp group, andinterestsadds them to interests within that group.interestsonly works alongsidegroup. Both match names case-insensitively.
If the same email submits the form twice, the plugin ignores the second submission. Existing subscribers keep their merge fields, tags, and group memberships exactly as they were. To update existing subscribers, use the webhook approach below.
Merge fields: mapping custom form fields to Mailchimp
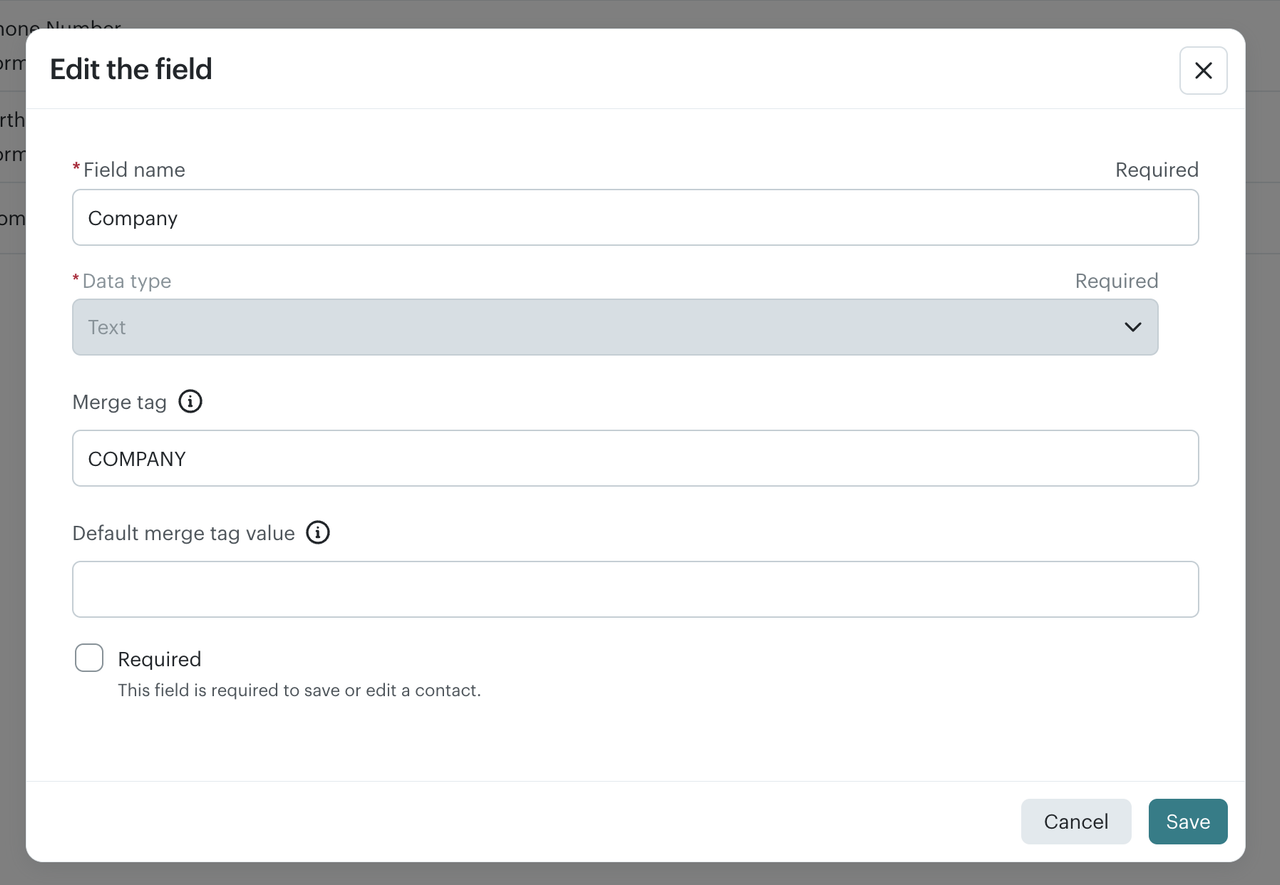
Every custom field on the Audience has a merge tag, visible in Mailchimp under Audience > Settings > Audience fields and |MERGE| tags. Formspree matches your form field names against those merge tags exactly, including capitalization. Use the merge tag you named, like COMPANY, not Mailchimp’s numbered default, like MERGE5.
Mailchimp merge tags are uppercase and 10 characters or fewer. A form field named company won’t populate a merge tag named COMPANY, and a field named NEWSLETTER_SOURCE can’t match any merge tag at all. Name the form field COMPANY, and keep custom field names within 10 characters.
Name your form fields to match the merge tags before you connect the plugin. The plugin skips merge fields it can’t match without showing an error, so a mismatch only shows up as missing data.
Consent and double opt-in
Consent involves two separate settings.
The _optin checkbox controls whether Formspree sends a submission to Mailchimp. Turn on the Opt-in Checkbox in the plugin settings, and Formspree sends only submissions where the box is checked. Without that setting, the plugin ignores the checkbox.
  <label>
    <input type="checkbox" name="_optin" />
    Yes, subscribe me to the newsletter.
  </label>
Leave required off the checkbox. If the box is required, every submission arrives checked and the gate does nothing. _optin is for forms with another purpose, like a contact form, where subscribing is optional.
Double opt-in is a Mailchimp Audience setting. Turn it on under Audience → Settings → Audience name and defaults, and Mailchimp sends a confirmation email before the subscriber becomes active.
_optin decides whether the submission reaches Mailchimp. Double opt-in decides whether the subscriber becomes active once it does.
Tag and source attribution
A hidden tags field lets one form track several sources:
<input type="hidden" name="tags" value="landing-page,q3-launch" />
Copy the same form to a different page and change the value to pricing-page,q3-launch, and every signup carries its source into Mailchimp. Segment on those tags later to compare subscribers from each page.
Tags must already exist in Mailchimp. Create them under Audience → Tags → Create a Tag before the form sends them. The plugin skips tag names it doesn’t recognize.
The default formspree tag lets you segment everyone who signed up through a Formspree form.
Where the plugin runs out of room
Four situations call for the webhook instead:
- Updating existing subscribers. The plugin ignores repeat submissions, so new merge field values, tags, or group changes for an existing subscriber need the webhook.
- Multiple Audiences. The plugin sends to one Audience. Splitting one form’s submissions between a consumer newsletter and a business announcements list, based on a field value, needs the webhook.
- Conditional tags. The plugin applies whatever tags the form sends. Tagging by country, referrer, or plan interest takes logic in a handler.
- Customer Journey events. Journeys can start from custom events sent through Mailchimp’s API. The plugin only adds subscribers, so firing an event takes the webhook.
Advanced setup: Formspree webhook to the Mailchimp API
Formspree POSTs the submission JSON to a function you deploy, and the function calls Mailchimp’s Marketing API to upsert the subscriber, apply tags, and optionally fire a Customer Journey event.
Set up three things in Mailchimp first:
- Generate an API key under Profile, Extras, API keys. The key looks like
abc123...-us14, and the suffix (us14) is the datacenter your account lives in. - Copy the Audience ID under Audience, Settings, Audience name and defaults. It’s a 10-character hex string near the top of the page.
- Store
MAILCHIMP_API_KEY,MAILCHIMP_DC(e.g.us14), andMAILCHIMP_AUDIENCE_IDin your serverless environment.
The function below computes the subscriber hash Mailchimp uses to identify a member, upserts the subscriber with PUT, then applies tags in a second call:
  // pages/api/mailchimp-webhook.js
  import crypto from 'crypto';

  export default async function handler(req, res) {
    if (req.method !== 'POST') return res.status(405).end();

    console.log('Formspree webhook received:', JSON.stringify(req.body));

    const { email, firstName, lastName, COMPANY, tags, _optin } = req.body.submission;

    // No consent, nothing to sync. Return 200 so Formspree closes the delivery.
    if (!_optin) return res.status(200).json({ skipped: 'no consent' });

    const dc = process.env.MAILCHIMP_DC;
    const audienceId = process.env.MAILCHIMP_AUDIENCE_ID;
    const auth = 'Basic ' + Buffer.from('anystring:' + process.env.MAILCHIMP_API_KEY).toString('base64');
    const subscriberHash = crypto
      .createHash('md5')
      .update(email.toLowerCase().trim())
      .digest('hex');

    const upsertRes = await fetch(
      `https://${dc}.api.mailchimp.com/3.0/lists/${audienceId}/members/${subscriberHash}`,
      {
        method: 'PUT',
        headers: { 'Content-Type': 'application/json', Authorization: auth },
        body: JSON.stringify({
          email_address: email.trim(),
          status_if_new: 'subscribed',
          merge_fields: Object.fromEntries(
            Object.entries({ FNAME: firstName, LNAME: lastName, COMPANY }).filter(
              ([, value]) => value
            )
          ),
        }),
      }
    );

    if (!upsertRes.ok) {
      console.error('Mailchimp upsert failed:', await upsertRes.text());
      // A 400 means Mailchimp rejected this address, so a retry can't fix it.
      return res.status(upsertRes.status === 400 ? 200 : 502).end();
    }

    if (tags) {
      const tagsRes = await fetch(
        `https://${dc}.api.mailchimp.com/3.0/lists/${audienceId}/members/${subscriberHash}/tags`,
        {
          method: 'POST',
          headers: { 'Content-Type': 'application/json', Authorization: auth },
          body: JSON.stringify({
            tags: tags.split(',').map(name => ({ name: name.trim(), status: 'active' })),
          }),
        }
      );

      if (!tagsRes.ok) {
        console.error('Mailchimp tagging failed:', await tagsRes.text());
        return res.status(502).end();
      }
    }

    res.status(200).json({ ok: true });
  }
PUT with status_if_new creates or updates. New addresses are added as subscribed. Existing subscribers keep their current status and get the new merge field values. Empty form fields are left out of merge_fields, so a blank last name doesn’t overwrite one Mailchimp already has. To send new addresses through Mailchimp’s double opt-in, change status_if_new to 'pending'. Don’t use status: 'pending', which also moves existing subscribers back to pending.
The handler skips submissions where _optin is unchecked and returns 200 so the delivery closes. The plugin’s Opt-in Checkbox setting doesn’t apply to webhooks, so the handler has to do this check itself.
Unlike the plugin, the tags endpoint creates any tag that doesn’t exist yet, so you don’t need to set tags up in Mailchimp first.
The Authorization header uses basic auth with the API key as the password. Mailchimp ignores the username, which is why the code uses anystring.
The handler lowercases and trims the address before hashing because Mailchimp’s subscriber hash is the MD5 of the lowercase address. Alice@example.com and alice@example.com produce different hashes, and a hash that doesn’t match the address fails the request.
Once the function is deployed, open the form in Formspree, go to the Workflow tab, click + Add New under Actions, select Simple Webhook (see the webhooks guide for the payload format), and paste the URL of your deployed function.
Note: Simple Webhooks require a Professional or Business plan.
Tightening the flow
Three additions for production:
- Route to different Audiences based on a form field. Replace the
audienceIdline in the handler with this. It assumes the form has a field namedaudience_type:
  const { audience_type } = req.body.submission;
  const audienceMap = {
    'Consumer': process.env.MAILCHIMP_AUDIENCE_NEWSLETTER,
    'Business': process.env.MAILCHIMP_AUDIENCE_ANNOUNCEMENTS,
  };
  const audienceId = audienceMap[audience_type] ?? process.env.MAILCHIMP_AUDIENCE_NEWSLETTER;
- Fire a Customer Journey event. A Journey that starts on a custom event can kick off a welcome sequence, a demo follow-up, or a webinar reminder from a form submission. The event
namehas to match the event the Journey listens for:
  const eventRes = await fetch(
    `https://${dc}.api.mailchimp.com/3.0/lists/${audienceId}/members/${subscriberHash}/events`,
    {
      method: 'POST',
      headers: { 'Content-Type': 'application/json', Authorization: auth },
      body: JSON.stringify({
        name: 'form_submitted',
        properties: { source: 'landing-page' },
      }),
    }
  );

  if (!eventRes.ok) {
    console.error('Mailchimp event failed:', await eventRes.text());
    return res.status(502).end();
  }
Check the response here, as with the tags call. If Mailchimp returns a 429 or 5xx and the handler still answers 200, Formspree closes the delivery and the subscriber never enters the Journey. Returning 502 makes Formspree retry the whole handler, which is safe for the upsert and tags calls but can fire the event more than once, so make the Journey tolerate repeat events.
- Verify the webhook signature. Anyone can POST to a public URL. Formspree signs webhook payloads so your function can reject forged requests. See Verify Webhook Signatures for how to check them. The signature covers the raw request body, so verify it before parsing the JSON.
What to do when things go wrong
The console.log at the top of the handler is there for this. It records the raw payload before any Mailchimp call, so every failure in your logs comes with the submission that caused it.
Formspree expects a 2xx within 3 seconds and retries any other response, or a timeout, up to 10 times. It also stores every submission in the dashboard regardless of the webhook result, so a failed subscribe delays the sync without losing the lead. Return 502 when the Mailchimp API fails so Formspree retries, and 200 when you skip a submission on purpose, like one without consent, so the delivery closes. A retried delivery can arrive more than once, but the upsert is safe to repeat, since a PUT on the same address just rewrites the same member.
Mailchimp’s Marketing API rate limit allows 10 simultaneous connections per API key. Normal signup traffic won’t reach that. A bulk backfill through the webhook can, and Mailchimp responds with a 429, which triggers a Formspree retry.
Invalid or previously bounced addresses come back as a 400 with a description. The handler logs it and returns 200 to close the delivery. Retrying a bad address won’t fix it.
Choosing between the plugin and the webhook
The plugin is the right starting point when one Audience covers the whole newsletter, merge fields map cleanly, and repeat submissions don’t need to update anything. Setup takes a couple of minutes and no deployed code.
The webhook is the right move when signups need to update existing subscribers, split across Audiences by a form field, apply conditional tags, or fire Customer Journey events. It requires a Professional or Business plan and a deployed function.
Start with the plugin. Send two or three test signups and check that subscribers land in the Audience with the right merge fields. If a merge field stays empty, check the form field’s capitalization first.
When you need to update existing subscribers or reach more than one Audience, add the Simple Webhook and disconnect the plugin. The form HTML stays as it is.
FAQ
Does Formspree integrate with Mailchimp?
Yes, natively via the Mailchimp plugin on the Professional and Business plans. Connect your Mailchimp account, pick an Audience, and every submission with an email field adds a subscriber.
How do I send form signups to a Mailchimp Audience?
In Formspree’s dashboard, open the form, go to the Workflow tab, click + Add New, select the Mailchimp plugin, and authorize Mailchimp. Then pick your target Audience.
What field names does the Mailchimp plugin recognize?
email (required), name or firstName/lastName, phone, address, tags, group, interests, and _optin. Custom merge fields are matched by exact form field name, including capitalization.
Why aren’t my custom merge fields showing up in Mailchimp?
Formspree matches merge fields against Mailchimp’s merge tags, including capitalization. Merge tags are uppercase and 10 characters or fewer, so a form field named company won’t populate a merge tag named COMPANY. Rename the form field to match the merge tag exactly.
How do I add tags to a Mailchimp subscriber from a form?
Include a tags field with comma-separated values. The tags must already exist in Mailchimp, or the plugin skips them.
Does the Formspree Mailchimp plugin support double opt-in?
Enable double opt-in in the Mailchimp Audience settings. Mailchimp then sends its confirmation email before marking the subscriber active.
How do I add a GDPR consent checkbox to my Mailchimp form?
Add an _optin checkbox to the form and turn on Opt-in Checkbox in the plugin settings. Formspree then sends the submission to Mailchimp only when the box is checked.
Can I add form submissions to a Mailchimp group or interest category?
Yes. Include a group field with the group name, and an interests field for interests within that group. Matching is case-insensitive, and the plugin skips names it doesn’t recognize.
What happens when someone submits the same email twice?
The plugin ignores the second submission. Existing merge fields, tags, and group memberships stay as they were. Use the webhook to update existing subscribers.
What is the Mailchimp API rate limit?
10 simultaneous connections per API key. Normal form traffic won’t reach it. On rate-limit errors, return a 5xx to Formspree so the delivery is retried.
Does Formspree keep the submission if Mailchimp fails?
Yes, always. Formspree stores every submission in its dashboard regardless of what happens downstream.
Can I switch from Mailchimp to ConvertKit or Klaviyo later?
Yes. Formspree has native plugins for all three. Disconnect the Mailchimp plugin, connect the new one, and the form HTML stays the same. Custom fields named for Mailchimp merge tags, like COMPANY, may need renaming to match the new tool.