Vuelidate: Form Validation in Vue.js
Validate user input in your Vue.js forms with Vuelidate’s powerful and flexible rules

Implementing the right form validation helps to build a smooth user experience and maintain data integrity in web applications. In Vue.js applications, Vuelidate offers a streamlined and efficient approach to form validation. This lightweight library, Vuelidate, simplifies the process, providing a more manageable alternative to native JavaScript validation or custom solutions.
With Vuelidate, developers can implement robust validation rules with ease, enhancing the reliability and usability of their forms. In this article, we will explore the advantages of using Vuelidate and guide you through its implementation in Vue.js applications.
What is Vuelidate?
Vuelidate is a JavaScript library designed for declarative form validation in Vue.js applications. It attaches validation rules directly to data models, making the process of validating forms more intuitive and less error-prone. This library leverages Vue’s reactive data binding, allowing developers to define validation rules in a straightforward manner.
The core principle of Vuelidate is to bind validation logic to the data model, which ensures that validation is automatically re-evaluated whenever the data changes. This approach simplifies the validation process and reduces the need for manual checks within the template or methods.
Key features of Vuelidate include built-in validators, composable rules, and support for asynchronous validation. The built-in validators cover common requirements like checking for required fields, email formats, and minimum lengths. Additionally, Vuelidate allows for custom validators, providing flexibility for more complex validation needs. Composable rules enable developers to combine multiple validation rules seamlessly, enhancing readability and maintainability.
Support for asynchronous validation is another standout feature, allowing for server-side checks or other complex validations that cannot be handled synchronously. This makes Vuelidate a versatile tool for a wide range of form validation scenarios in Vue.js applications.
Getting Started with Vuelidate
Getting started with Vuelidate is straightforward. First, install the library using npm or yarn:
  npm install @vuelidate/core @vuelidate/validators
  # or
  yarn add @vuelidate/core @vuelidate/validators
Once installed, you need to import Vuelidate into your Vue component. Begin by setting up Vuelidate and defining your validations. Here’s a basic example:
  // Import Vuelidate core functionality and common validators
  import useVuelidate from '@vuelidate/core'
  import { required, email, minLength } from '@vuelidate/validators'

  export default {
    // Return the validation instance to be used in template
    setup() {
      return { v$: useVuelidate() }
    },

    data() {
      return {
        email: '',
        message: ''
      }
    }

    validations() {
      // Define validation rules for each form field
      return {
        email: { required, email }, // Email must be present and in valid format
        message: { required, maxLength: maxLength(200) }, // Message can only be 200 characters maximum
      }
    }
  }
In this example, the returned object from the validations() function defines validation rules for the email, and mesage fields. The required validator ensures the fields are not empty, the email validator checks for a valid email format and maxLength ensures the message has a maximum length specified.
To integrate Vuelidate with your template, use the v$.fieldName.$touch() method when the user completes providing input to a field, and display error messages based on the validation state:
  <form @submit.prevent="submitForm">
    <input v-model="email" @blur="v$.email.$touch()" />
    <span v-if="v$.email.$error">Enter a valid email.</span>

    <button type="submit">Submit</button>
  </form>
This setup ensures near real-time validation feedback without annoying the user by showing error states at every new character input.
Trying Out Some Example Use Cases with Vuelidate
Now that you understand how to set up the Vuelidate library in your Vue project, let’s take a look at some example use-cases for this library.
Scenario 1: Simple Contact Form
If you were to create a simple contact form using Vuelidate, you could expand upon the example you saw earlier by adding a name field to it. Here’s a quick walkthrough:
Step 1: Define the Form: Create a Vue component with input fields for name, email, and message:
  <template>
    <div class="card">
      <form @submit.prevent="submitForm">
        <div :class="['input-group']">
          <div>
            <label class="form-label" for="name">{{ "Name : " }}</label>
            <input v-model="name" @blur="v$.name.$touch()" />
          </div>
          <div class="form-input-hint" v-if="!!v$.name.$error">
            Please enter a valid name.
          </div>
        </div>

        <div :class="['input-group']">
          <div>
            <label class="form-label" for="email">{{ "Email : " }}</label>
            <input v-model="email" @blur="v$.email.$touch()" />
          </div>
          <div class="form-input-hint" v-if="!!v$.email.$error">
            Please enter a valid email.
          </div>
        </div>

        <div :class="['input-group']">
          <div>
            <label class="form-label" for="message">{{ "Message : " }}</label>
            <input v-model="message" @blur="v$.message.$touch()" />
          </div>
          <div class="form-input-hint" v-if="!!v$.message.$error">
            Please enter less than 200 characters.
          </div>
        </div>

        <button type="submit">Submit</button>
      </form>
    </div>
  </template>
Classes have been used in this example to be able to style the form as you like. Other than that, labels have been added, and forced boolean conversion through !! has been set up for the v-if expressions.
Step 2: Set Up Validation Rules: In your script, define validation rules using Vuelidate:
  <script>
  // Import Vuelidate core and validators
  import useVuelidate from '@vuelidate/core'
  import { required, email, maxLength } from '@vuelidate/validators'

  export default {
    setup() {
      // Initialize Vuelidate instance
      return {
        v$: useVuelidate()
      }
    },
    data() {
      // Define form data properties
      return {
        name: '',
        email: '',
        message: ''
      }
    },
    validations() {
      // Define validation rules for each form field
      return {
        name: { required }, // Name field is required
        email: { required, email }, // Email must be present and valid format
        message: { maxLength: maxLength(200) }, // Message has 200 character limit
      }
    },
    methods: {
      async submitForm() {
        // Validate all form fields before submission
        const isFormCorrect = await this.v$.$validate()
        if (!isFormCorrect) return // Stop if validation fails

        // Form is valid, you can handle the submission here
        console.log('Form submitted:', {
          name: this.name,
          email: this.email,
          message: this.message
        })
      }
    }
  }
  </script>
The script has inline comments to help explain what’s happening. In short:
data()defines the initial data values for the formvalidations()sets up the validation rules, similar to the last examplemethods()defines an asynchronous methodsubmitForm()which is used to handle the form submission.
Here’s how the form displays errors:
In this example, the component just logs the data in the browser’s console to simulate submission. In the next example, you will see how to actually send form data to a forms backend on submission.
Scenario 2: Contact Form That Submits to A Forms Backend (i.e. Formspree!)
For a contact form that submits to a backend service like Formspree, you will need to update the submitForm() method. But before that, let’s replace the form template with the following to have a few more fields in the mix:
  <template>
    <form @submit.prevent="submitForm">
      <div>
        <label for="firstName">First Name:</label>
        <input v-model="firstName" @blur="v$ && v$.firstName.$touch()" />
        <span v-if="v$ && v$.firstName.$error">First name is required.</span>
      </div>

      <div>
        <label for="lastName">Last Name:</label>
        <input v-model="lastName" @blur="v$ && v$.lastName.$touch()" />
        <span v-if="v$ && v$.lastName.$error">Last name is required.</span>
      </div>

      <div>
        <label for="email">Email:</label>
        <input v-model="email" @blur="v$ && v$.email.$touch()" />
        <span v-if="v$ && v$.email.$error">Enter a valid email.</span>
      </div>

      <div>
        <label for="message">Message:</label>
        <textarea v-model="message" @blur="v$ && v$.message.$touch()"></textarea>
        <span v-if="v$ && v$.message.$error">Message is required.</span>
      </div>

      <button type="submit" :disabled="isSubmitting">
        {{ isSubmitting ? 'Submitting...' : 'Submit' }}
      </button>
    </form>
  </template>
Now, set up vuelidate like you did before. In this example, you will also track the form’s submission state to disable the submit button while the form is being submitted and avoid receiving duplicate submissions:
  <script>
  // Import required validators and Vuelidate core
  import { required, email } from '@vuelidate/validators'
  import useVuelidate from '@vuelidate/core'

  export default {
    setup() {
      // Initialize Vuelidate instance
      return {
        v$: useVuelidate()
      }
    },
    data() {
      // Define form data properties
      return {
        firstName: '',
        lastName: '',
        email: '',
        message: '',
        isSubmitting: false, // Track submission state for UI feedback
      }
    },
    validations() {
      // Define validation rules for each form field
      return {
        firstName: { required }, // First name is required
        lastName: { required }, // Last name is required
        email: { required, email }, // Email must be present and valid format
        message: { required }, // Message is required
      }
    },
    methods: {
      // ... you will add the submitForm function here
    }
  }
  </script>
Finally, replace the methods property with the following:
  methods: {
    async submitForm() {
      // Check if Vuelidate is initialized
      if (!this.v$) return

      // Validate all form fields before submission
      const isFormCorrect = await this.v$.$validate()
      if (!isFormCorrect) return // Stop if validation fails

      // Set submission state to show loading
      this.isSubmitting = true

      try {
        // Create FormData object for submission
        const formData = new FormData()
        formData.append('firstName', this.form.firstName)
        formData.append('lastName', this.form.lastName)
        formData.append('email', this.form.email)
        formData.append('message', this.form.message)

        // Submit form data to Formspree endpoint
        const response = await fetch('https://formspree.io/f/YOUR_FORM_ID', {
          method: 'POST',
          body: formData,
          headers: {
            'Accept': 'application/json'
          }
        })

        if (response.ok) {
          console.log('Form submitted successfully')
          // Reset form and validation state on success
          this.form.firstName = ''
          this.form.lastName = ''
          this.form.email = ''
          this.form.message = ''
          this.v$.$reset()
        } else {
          console.error('Form submission failed:', response.status)

          // Log server-side validation errors
          const serverErrors = (await response.json()).errors
          serverErrors.forEach(error => {
            console.error(error.field + " " + error.message)
          })
        }
      } catch (error) {
        console.error('Submission error:', error)
      } finally {
        // Reset submission state regardless of outcome
        this.isSubmitting = false
      }
    }
  }
The submitForm function sends form data to Formspree via AJAX. You will need to replace 'YOUR_FORM_ID' with your actual Formspree form ID. To get one, head over to the Formspree dashboard. Create a new, free Formspree account if you don’t have one already.
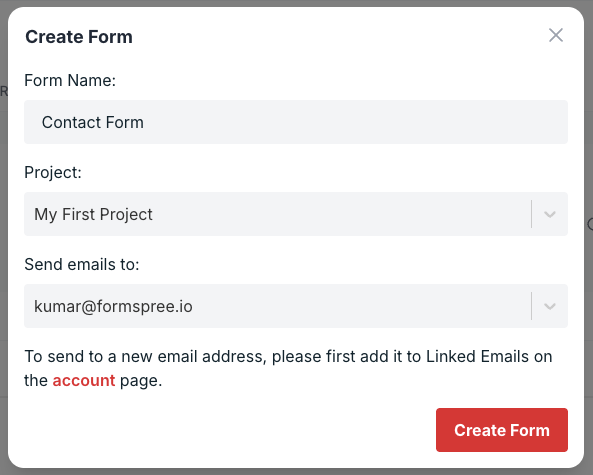
Once on the dashboard, create a new form with ++ Add New > New Form, call it Contact form and update the recipient email to the email where you wish to receive your form submissions. Then click Create Form.
On the form details page, you will find the Form Endpoint:
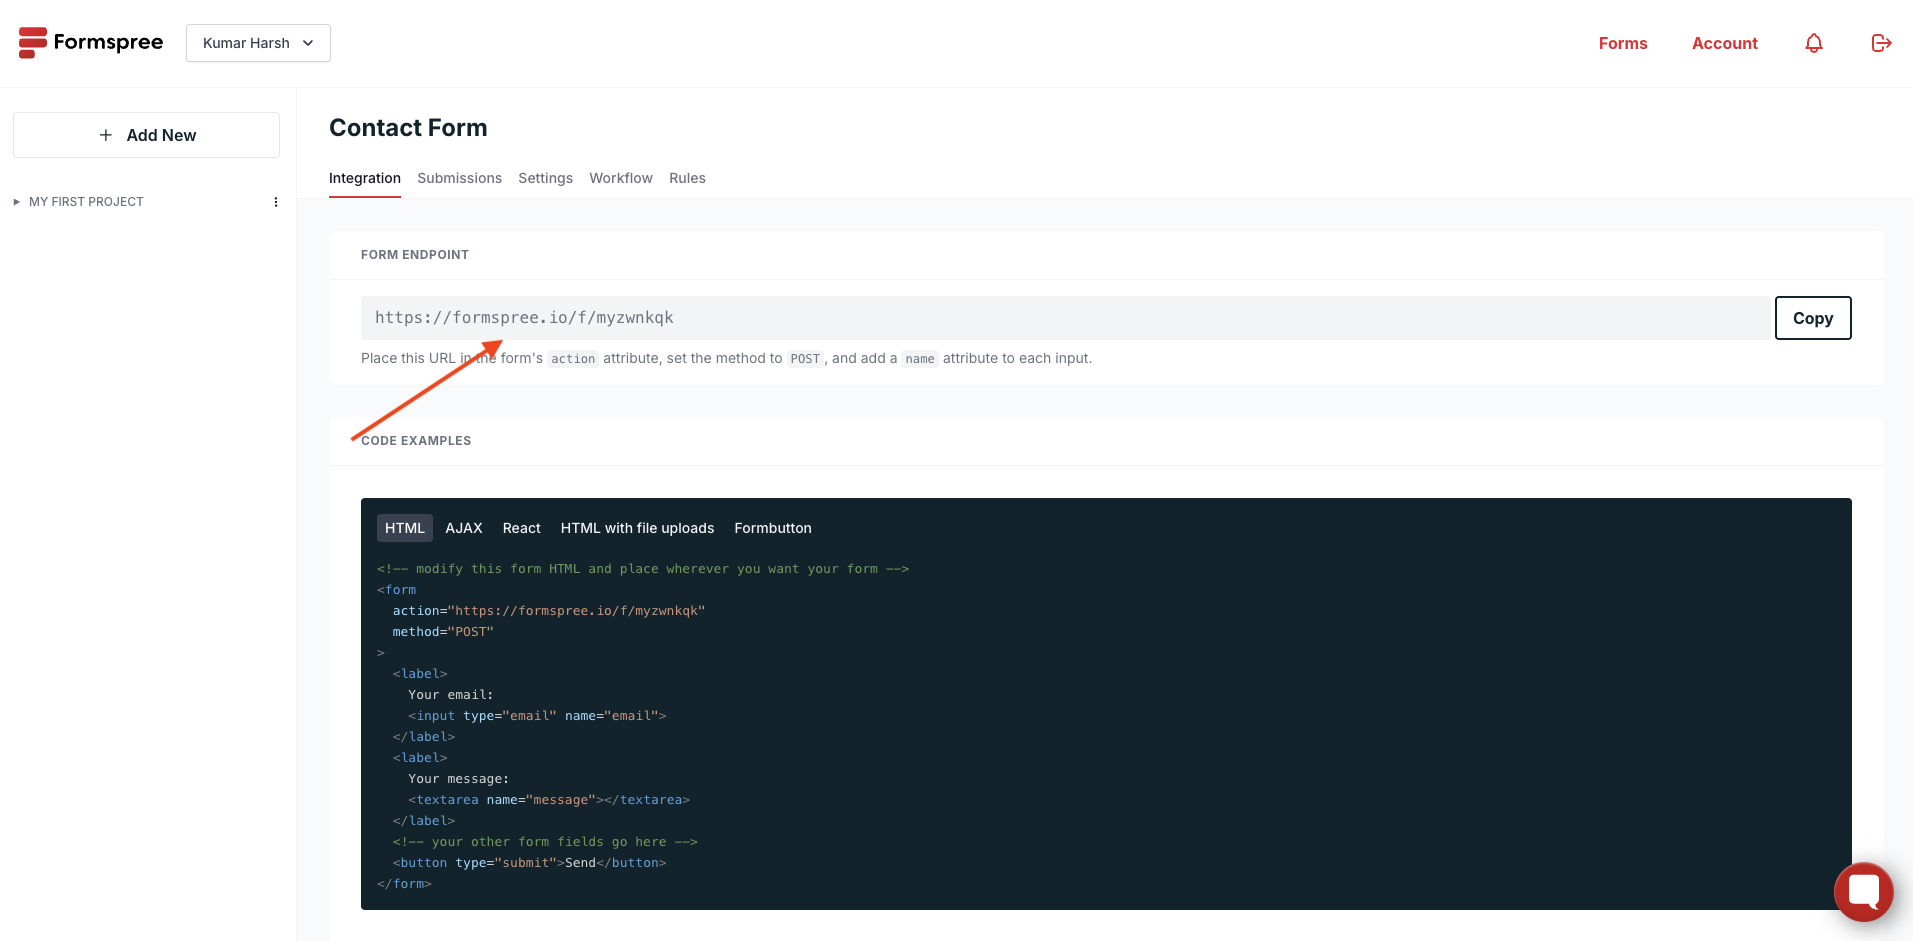
Replace YOUR_FORM_ID with the form ID from the endpoint. Now, your Vue form is ready! Try filling out the form to see the real-time validation happen before you submit the form.
If the submission fails, you can handle server-side validation errors by checking the response from Formspree. While these are currently logged to the browser console, you can handle them better by showing user-friendly alerts or messages to help the user fix the issues with their input.
Also, this setup ensures that your form is validated both client-side with Vuelidate and server-side with Formspree, providing a robust validation solution.
Scenario 3: Multi-Step Form with Conditional Validation
To take things up another level, let’s try a more complex form: a multi-step inquiry form with conditional validation. In such cases as well, Vuelidate can efficiently manage validation rules that change based on user input. Here’s how to implement this scenario:
Step 1: Define the Multi-Step Form Structure: Create a Vue component with different steps, each containing specific fields. Use Vue’s reactive data and conditional rendering to control the display of each step:
  <template>
    <form @submit.prevent="submitForm">
      <div v-if="step === 1" class="step">
        <h2>Personal Information</h2>
        <div class="form-group">
          <label for="firstName">First Name:</label>
          <input v-model="firstName" @blur="v$ && v$.firstName.$touch()" />
          <span v-if="v$ && v$.firstName.$error">First name is required.</span>
        </div>

        <div class="form-group">
          <label for="lastName">Last Name:</label>
          <input v-model="lastName" @blur="v$ && v$.lastName.$touch()" />
          <span v-if="v$ && v$.lastName.$error">Last name is required.</span>
        </div>

        <div class="step-buttons">
          <button type="button" @click="nextStep" :disabled="!isStep1Valid">Next</button>
        </div>
      </div>

      <div v-if="step === 2" class="step">
        <h2>Contact Information</h2>
        <div class="form-group">
          <label for="email">Email:</label>
          <input v-model="email" @blur="v$ && v$.email.$touch()" />
          <span v-if="v$ && v$.email.$error">Enter a valid email.</span>
        </div>

        <div class="form-group">
          <label for="phone">Phone Number:</label>
          <input v-model="phone" @blur="v$ && v$.phone.$touch()" />
          <span v-if="v$ && v$.phone.$error">Enter a valid phone number.</span>
        </div>

        <div class="step-buttons">
          <button type="button" @click="prevStep">Back</button>
          <button type="button" @click="nextStep" :disabled="!isStep2Valid">Next</button>
        </div>
      </div>

      <div v-if="step === 3" class="step">
        <h2>Your Message</h2>
        <div class="form-group">
          <label for="message">Message:</label>
          <textarea v-model="message" @blur="v$ && v$.message.$touch()"></textarea>
          <span v-if="v$ && v$.message.$error">Message is required.</span>
        </div>

        <div class="step-buttons">
          <button type="button" @click="prevStep">Back</button>
          <button type="submit" :disabled="isSubmitting">
            {{ isSubmitting ? 'Submitting...' : 'Submit' }}
          </button>
        </div>
      </div>
    </form>
  </template>
In this form, the first step asks for the first and last names. The second step assk for contact details (email and phone number), and the third step collects the inquiry message.
Next, set up the validation and submission logic for the form:
  <script>
  // Import required validators and Vuelidate core
  import { required, email, numeric } from '@vuelidate/validators'
  import useVuelidate from '@vuelidate/core'

  export default {
    setup() {
      // Initialize Vuelidate instance
      return {
        v$: useVuelidate()
      }
    },
    data() {
      // Define form data properties
      return {
        firstName: '',
        lastName: '',
        email: '',
        phone: '',
        message: '',
        step: 1, // Track current form step
        isSubmitting: false // Track submission state
      }
    },
    validations() {
      // Define validation rules for each form field
      return {
        firstName: { required }, // First name is required
        lastName: { required }, // Last name is required
        email: { required, email }, // Email must be present and valid format
        phone: { required, numeric }, // Phone must be present and numeric
        message: { required } // Message is required
      }
    },
    computed: {
      // Check if step 1 fields are valid to enable next button
      isStep1Valid() {
        return this.v$ && !this.v$.firstName.$invalid && !this.v$.lastName.$invalid
      },
      // Check if step 2 fields are valid to enable next button
      isStep2Valid() {
        return this.v$ && !this.v$.email.$invalid && !this.v$.phone.$invalid
      }
    },
    methods: {
      // Navigate to next step
      nextStep() {
        this.step++
      },
      // Navigate to previous step
      prevStep() {
        this.step--
      },
      async submitForm() {
        // Check if Vuelidate is initialized
        if (!this.v$) return
        // Validate all form fields before submission
        const isFormCorrect = await this.v$.$validate()
        if (!isFormCorrect) return // Stop if validation fails

        // Set submission state to show loading
        this.isSubmitting = true

        try {
          // Create FormData object for submission
          const formData = new FormData()
          formData.append('firstName', this.firstName)
          formData.append('lastName', this.lastName)
          formData.append('email', this.email)
          formData.append('phone', this.phone)
          formData.append('message', this.message)

          console.log(formData)

          // Submit form data to Formspree endpoint
          const response = await fetch('https://formspree.io/f/YOUR_FORM_ID', {
            method: 'POST',
            body: formData,
            headers: {
              'Accept': 'application/json'
            }
          })

          if (response.ok) {
            console.log('Form submitted successfully')
            // Reset form data on success
            this.firstName = ''
            this.lastName = ''
            this.email = ''
            this.phone = ''
            this.message = ''

            // Reset validation state
            this.v$.$reset()

            // Reset form steps
            this.step = 1
          } else {
            console.error('Form submission failed:', response.status)

            // Handle server-side validation errors
            const serverErrors = (await response.json()).errors
            serverErrors.forEach(error => {
              console.error(error.field + " " + error.message)
            })
          }
        } catch (error) {
          console.error('Submission error:', error)
        } finally {
          // Reset submission state regardless of outcome
          this.isSubmitting = false
        }
      }
    }
  }
  </script>
Similar to the previous example, you have implemented near real-time form validation here as well. To be able to test out the form, you will first need to replace YOUR_FORM_ID in the POST requests’s URL with your Formspree form ID. This example should help you understand how to use vuelidate in complex conditional rendering situations easily.
Best Practices for Using Vuelidate
To make the most out of Vuelidate, there are a few tips you can consider following best to maintain clean, efficient, and user-friendly code.
For starters, you should keep validation logic separate from your component templates. You should define validation rules in a dedicated part of your script to enhance readability and maintainability. Also, consider creating reusable validation rules for common patterns, such as email or date format. By defining these rules once and reusing them across different components, you can ensure consistency and reduce duplication in your codebase.
You should utilize Vuelidate’s support for asynchronous validation for server-side checks or complex rules that require external data. For instance, you can validate a username’s uniqueness by making an API call to your backend. This approach ensures your application handles validation comprehensively.
Needless to say, you should implement error handling and provide clear, user-friendly feedback for validation failures. Make sure to customize error messages to be specific and helpful, guiding users on how to resolve the issues.
Vuelidate makes it very easy to override default error messages to suit your application’s requirements, such as supporting multiple languages or specific terminology. Consider making use of it, and customizing messages directly within the validation rules, making for easy localization and a consistent user experience.
Finally, ensure your form validation is accessible to all users, including those with disabilities. Use ARIA attributes to associate error messages with corresponding form fields, enabling screen readers to convey validation errors to users who rely on assistive technologies.
Conclusion
To sum up, Vuelidate’s declarative validation model, combined with features like built-in and custom validators, composable rules, and asynchronous validation support, simplifies the process of ensuring data integrity and enhancing user experience. By integrating Vuelidate, Vue developers can maintain clean and maintainable code while providing real-time feedback and customization for end users.
Following best practices, such as separating validation logic, creating reusable rules, and implementing proper error handling, will help you make the most of this library. For further learning, consider exploring Vuelidate’s documentation to deepen your understanding and stay updated with new features and improvements.