Mastering Form Validation with jQuery Validate
Master form validation with jQuery Validate for accurate user input and a smooth user experience
Form validation helps ensure that users of a web app provide the necessary information in the correct format, which is essential for both user experience and data integrity. While server-side validation is non-negotiable for security, relying solely on it can lead to performance bottlenecks and a suboptimal user experience.
Enter jQuery Validate, a widely used client-side validation library. Originating from the early jQuery ecosystem, jQuery Validate has evolved through continuous development and maintenance by a dedicated team. Its current version enjoys active community support, making it a reliable choice for developers.
In this article, you will learn how to leverage jQuery Validate to improve the quality of data your web forms collect. From understanding the limitations of HTML5 validation to implementing validation rules and customizing error messages, this guide will provide a complete overview of jQuery Validate.
Why Use jQuery validate?
HTML3 introduced built-in validation attributes, which offered a basic level of form validation. However, even in HTML5, these attributes are quite basic and limited. While these attributes, such as required, pattern, and type, provide a straightforward way to enforce user input rules, they lack flexibility and customization options, and their error messages are often browser-dependent and not user-friendly. Additionally, HTML5 validation cannot cover complex validation scenarios or provide real-time feedback effectively.
jQuery Validate, a jQuery plugin for form validation, addresses these limitations with its extensive set of features and capabilities.
One of the primary strengths of jQuery Validate is its comprehensive collection of built-in validation methods. It supports common validation rules like required, email, and URL, as well as more complex ones. This flexibility allows developers to create robust validation schemes for various input types without reinventing the wheel.
Customization is another area where jQuery Validate shines. Instead of relying on browser-generated messages, developers can define custom error messages that are more informative and aligned with the application’s tone. The plugin also offers options to style error messages and highlight invalid form fields, ensuring a consistent and visually appealing user experience.
Despite its extensive feature set, jQuery Validate remains lightweight and efficient. The library’s codebase is optimized for performance, ensuring that adding client-side validation does not negatively impact page load times or responsiveness. This makes it suitable for a wide range of web applications, from simple forms to complex data entry systems.
The large and active community surrounding jQuery Validate is another significant advantage. The extensive documentation and numerous online resources, such as tutorials and forums, make it easy to get started and troubleshoot issues. Community contributions ensure that the library stays up-to-date with new web standards and best practices, offering continued support for developers.
When to Use jQuery Validate?
jQuery Validate is particularly useful in scenarios where real-time user feedback and a seamless user experience are most important. For example, in web forms that require multiple validation rules across multiple fields, jQuery Validate can provide instant feedback as users fill out the form, reducing errors and improving overall usability. This is crucial for applications where user experience is a top priority, such as e-commerce checkout processes or online registration forms.
Furthermore, jQuery Validate is an excellent choice for projects that already leverage the jQuery library. Integrating jQuery Validate is straightforward, allowing developers to build on their existing knowledge of jQuery and its syntax. This reduces the learning curve and accelerates the implementation process.
Server-side Validation and jQuery Alternatives
While client-side validation enhances user experience, it is essential to remember that server-side validation remains crucial for security-sensitive data. Server-side validation acts as a final check to prevent malicious user input and ensure data integrity, complementing the client-side validation provided by jQuery Validate. Together, they form a strong validation strategy that balances user experience and security.
There are alternative libraries for client-side validation, such as Parsley.js and Validate.js, but jQuery Validate’s popularity and ease of use make it a preferred choice for many developers. Its long-standing presence in the community and ongoing updates ensure reliability and compatibility with various web technologies.
To sum up, jQuery Validate offers a powerful, flexible, and efficient solution for client-side form validation. Its extensive validation methods, customization options, and easy integration with jQuery as a jQuery plugin make it an invaluable tool for web developers. Whether you are building simple forms or complex validation schemes, jQuery Validate provides the functionality and support you need to offer a great user experience and maintain data accuracy.
Getting Started with jQuery Validate: A Step-by-Step Tutorial
Before diving into jQuery Validate, you should ensure you have a basic understanding of HTML, JavaScript, and jQuery. If jQuery is not already included in your project, you will need to add it by including its CDN link from the jQuery releases page in your HTML file:
  <script
    src="https://code.jquery.com/jquery-3.1.1.js"
    integrity="sha256-eKhayi8LEQwp4NKxN+CfCh+3qOVUtJn3QNZ0TciWLP4="
    crossorigin="anonymous"
  ></script>;
jQuery Validate has been tested to work with jQuery 3.1.1, so it’s best if you can use that version in your project. It will still work with other jQuery versions; however, there’s a small chance you might run into unexpected errors.
Once you have set up jQuery, you can install jQuery Validate using a package manager such as Bower (bower install jquery-validation), Nuget (Install-Package jQuery.Validation), or npm (npm i jquery-validation). You can also include it via a CDN link, such as:
  <script src="https://cdn.jsdelivr.net/npm/jquery-validation@1.19.5/dist/jquery.validate.js">
  </script>;
You’re now ready to start using jQuery Validate!
Basic Usage
Let’s start with some basic usage of the library. To do that, let’s consider this HTML form:
  <form id="myForm">
    <label for="name">Name:</label>
    <input type="text" id="name" name="name">
    <label for="email">Email:</label>
    <input type="email" id="email" name="email">
    <button type="submit">Submit</button>
  </form>
Here’s how you can make email and name mandatory fields, and check for a valid email address:
  <script>
    $(document).ready(function() {
      $("#myForm").validate({
        rules: {
          name: {
            required: true
          },
          email: {
            required: true,
            email: true
          }
        },
        messages: {
          name: {
            required: "Please enter your name"
          },
          email: {
            required: "Please enter your email",
            email: "Please enter a valid email address"
          }
        }
      });
    });
  </script>
The rules property defines the validation criteria for each input field, while the messages property provides custom validation error messages for when the corresponding validation fails.
Here’s what the form will look like (with some basic CSS styling):
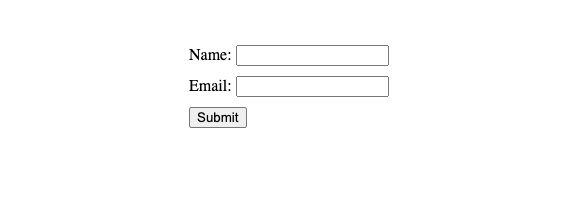
If you try submitting it without entering anything in the fields, here’s what the error messages will look like:
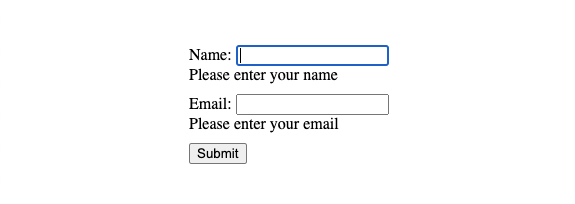
At this point, if you edit the contents of the field, jQuery Validate will automatically take care of running the validations on each change and finally once before the form is submitted.
Styling the Error Messages
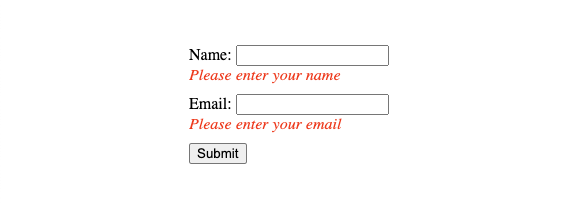
If you want to style the error messages, you can do so by using the class error that jQuery attaches by default to the label objects. For example, setting the following CSS in the HTML file will make the error messages appear italicised and in red:
  .error {
      color: red;
      font-style: italic;
  }
Here’s how it will look:
If you are concerned about using this same error class in other parts of your code, jQuery allows you to customize this as well. You can do so by adding the option errorClass to the jquery.validate() call like this:
  $("#myForm").validate({
    rules: {
      name: {
        required: true
      },
      email: {
        required: true,
        email: true
      }
    },
    // Add this ⬇️
    errorClass: "invalid",

    messages: {
      name: {
        required: "Please enter your name"
      },
      email: {
        required: "Please enter your email",
        email: "Please enter a valid email address"
      }
    }
  });
If just renaming the class wouldn’t cut it for you, you can also wrap around the error <label> element with any other element of your choice by using the following option:
wrapper: "li" // or any other element
In fact, you can use a whole other element for rendering the error message instead of a <label>, if needed:
errorElement: "li" // in case you want to display a list of error messages
However, it is not recommend to change the <label> to any other element unless absolutely necessary for semantics and accessibility.
If you want to style the input elements to indicate that there is a validation error (maybe make the border red in color), you can use the invalid class that gets applied to each input field that fails validation. So, if you were to use the following CSS, the border of the input fields would turn red when there would be a validation error with them:
  input.invalid {
      border-color: red;
  }
This is how it will look:
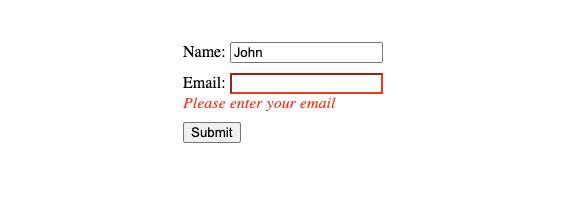
invalid and valid are two classes used by jQuery validate internally to mark the input fields that were failed and succeeded validation checks respectively. This means that you can use the input.valid selector to style fields that succeeded validation as well.
Additional Features
Apart from the basic validation you saw above, jQuery Validate offers advanced features that enhance its flexibility and functionality.
For starters, you can create custom validation methods. If you wanted to add a custom validation method that checks for a specific word:
  <script>
    $.validator.addMethod("containsWord", function(value, element, param) {
      return value.includes(param);
    }, "Please include the word '{0}'");

    $("#myForm").validate({
      rules: {
        name: {
          required: true,
          containsWord: "jQuery"
        }
      },
      messages: {
        name: {
          required: "Please enter your name",
          containsWord: "Your name must contain the word 'jQuery'"
        }
      }
    });
  </script>
jQuery Validate supports remote validation, which allows you to check the validity of an input field asynchronously by sending a request to the server. For example:
  $("#myForm").validate({
    rules: {
      username: {
        required: true,
        remote: "check-username.php",
      },
    },
    messages: {
      username: {
        required: "Please enter a username",
        remote: "Username is already taken",
      },
    },
  });
Error placement options let you control where error messages appear in the form:
  errorPlacement: function(error, element) {
    error.appendTo(element.parent());
  }
Combining Client Side Errors and Server Side Errors from Formspree
If you’re using Formspree to handle your form submissions, you must be aware of the server side validation that Formspree supports. This means that after the client-side validation is run and the form is submitted, you still need a way to display the server-side validation errors, if any. Fortunately, doing that with jQuery Validate isn’t too much of a hassle.
Take the previous contact form for example:
  <!DOCTYPE html>
  <html lang="en">

  <head>
      <meta charset="UTF-8">
      <meta name="viewport" content="width=device-width, initial-scale=1.0">
      <title>Form Validation with jQuery and Formspree</title>
      <script src="https://code.jquery.com/jquery-3.1.1.js"></script>
      <script src="https://cdn.jsdelivr.net/npm/jquery-validation@1.19.5/dist/jquery.validate.js"></script>
      <link rel="stylesheet" href="./styles.css" />
  </head>

  <body>
      <form id="myForm">
          <div class="fieldset">
              <label for="name">Name:</label>
              <input type="text" id="name" name="name">
          </div>
          <div class="fieldset">
              <label for="email">Email:</label>
              <input type="email" id="email" name="email">
          </div>
          <button type="submit">Submit</button>
      </form>

      <script>
          $(document).ready(function () {
              $("#myForm").validate({
                  rules: {
                      email: {
                          required: true,
                          email: true
                      },
                  },
                  messages: {
                      email: {
                          required: "Please enter your email",
                          email: "Please enter a valid email address"
                      },
                  },
              });
          });

      </script>
  </body>

  </html>
This form has been updated to have a name and an email field, and only check for valid emails on the client side before submitting the form.
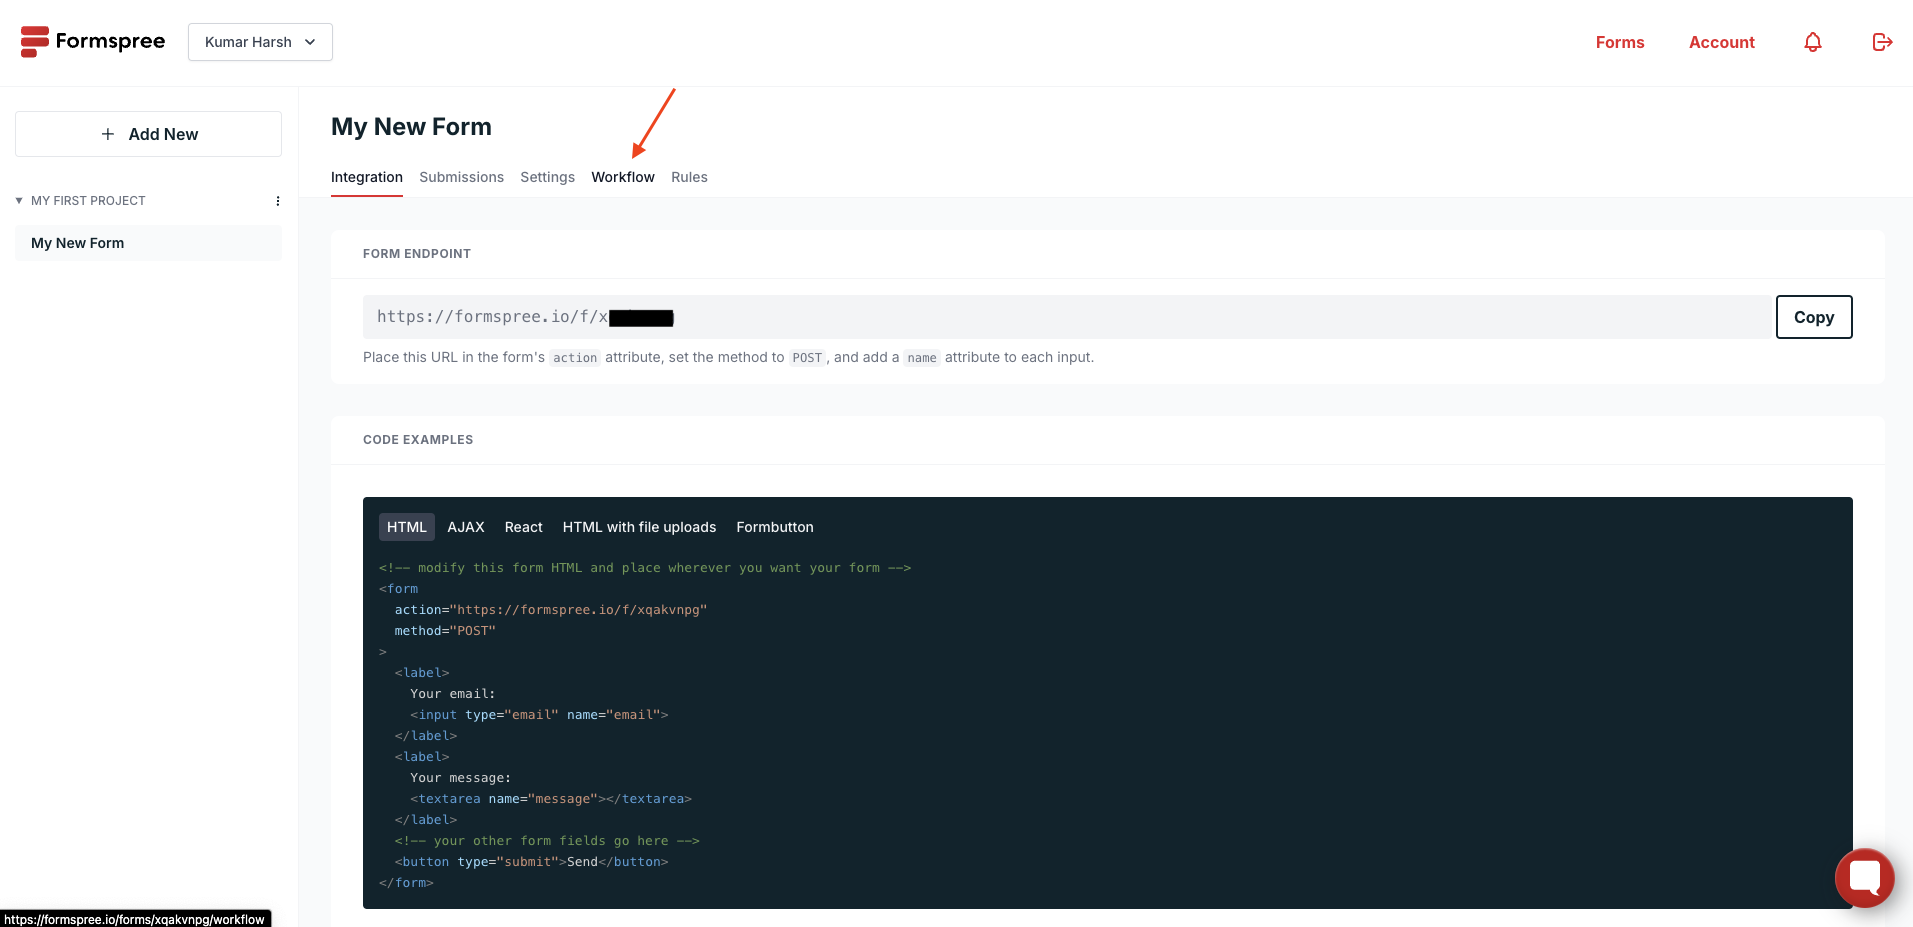
Now, head over to the Formspree dashboard and create a new form. On the new form’s overview page, click on the Workflows tab:
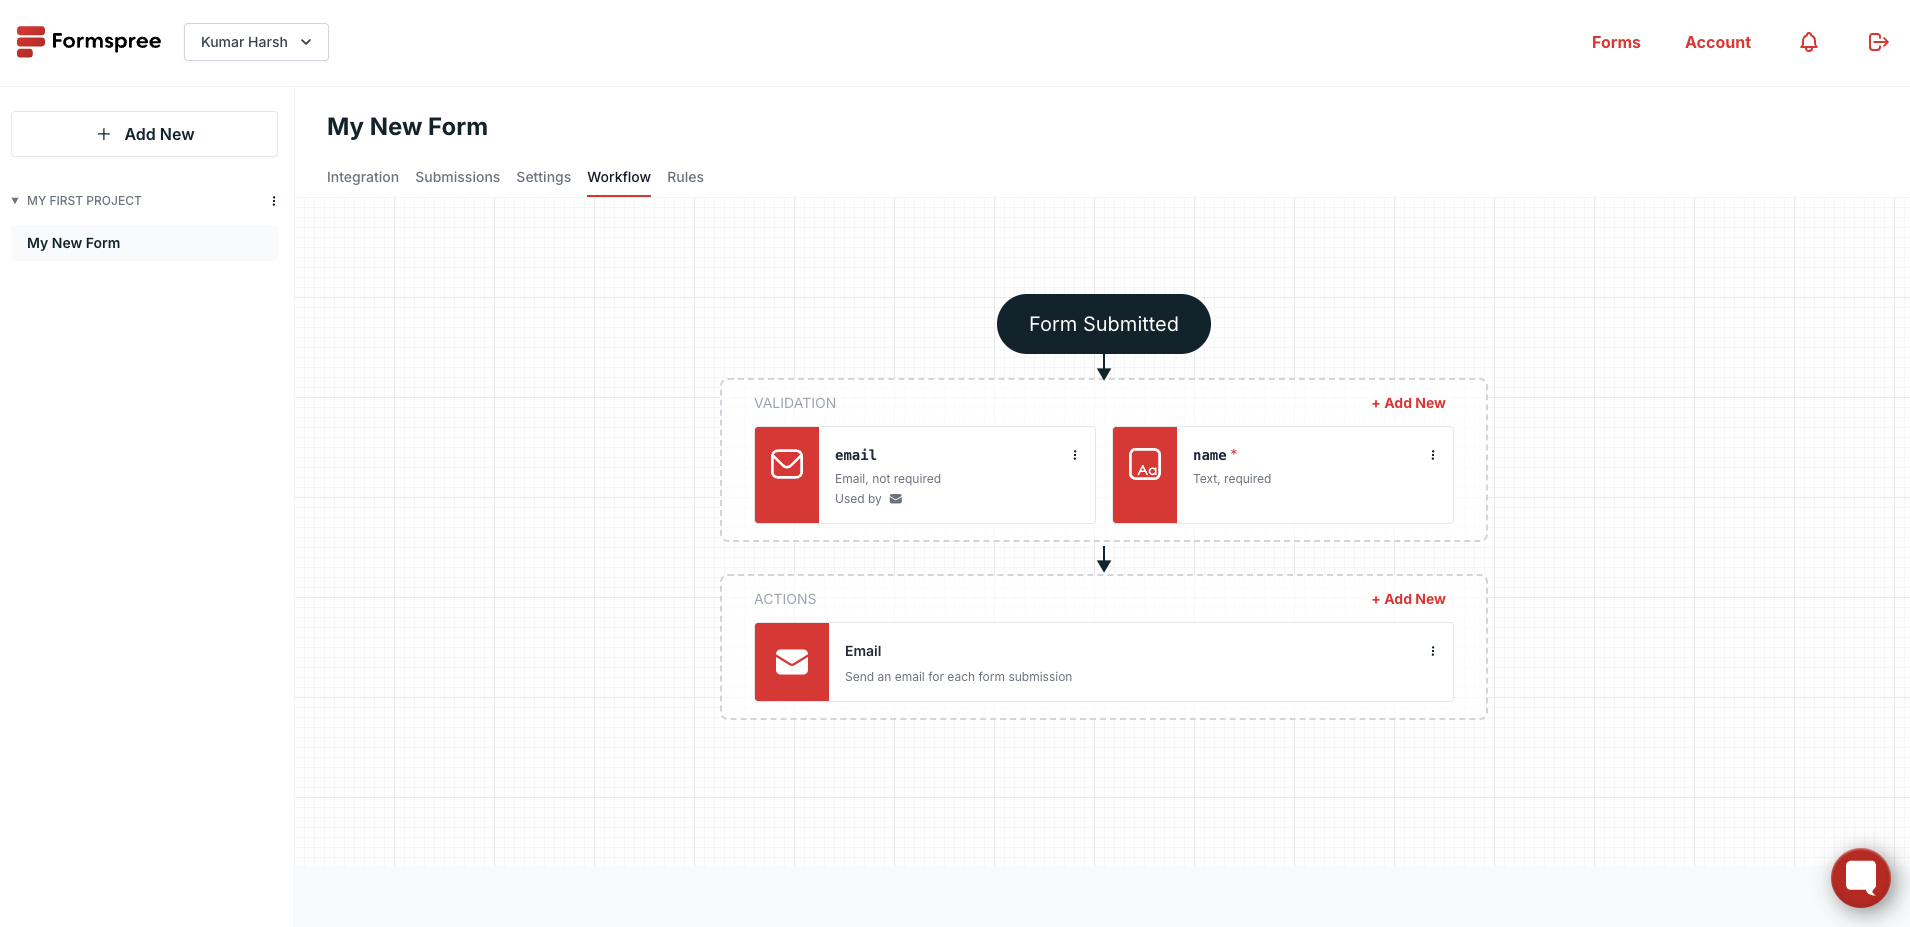
On this tab, you will notice that the form already has an email field by default with validations and required check enabled:
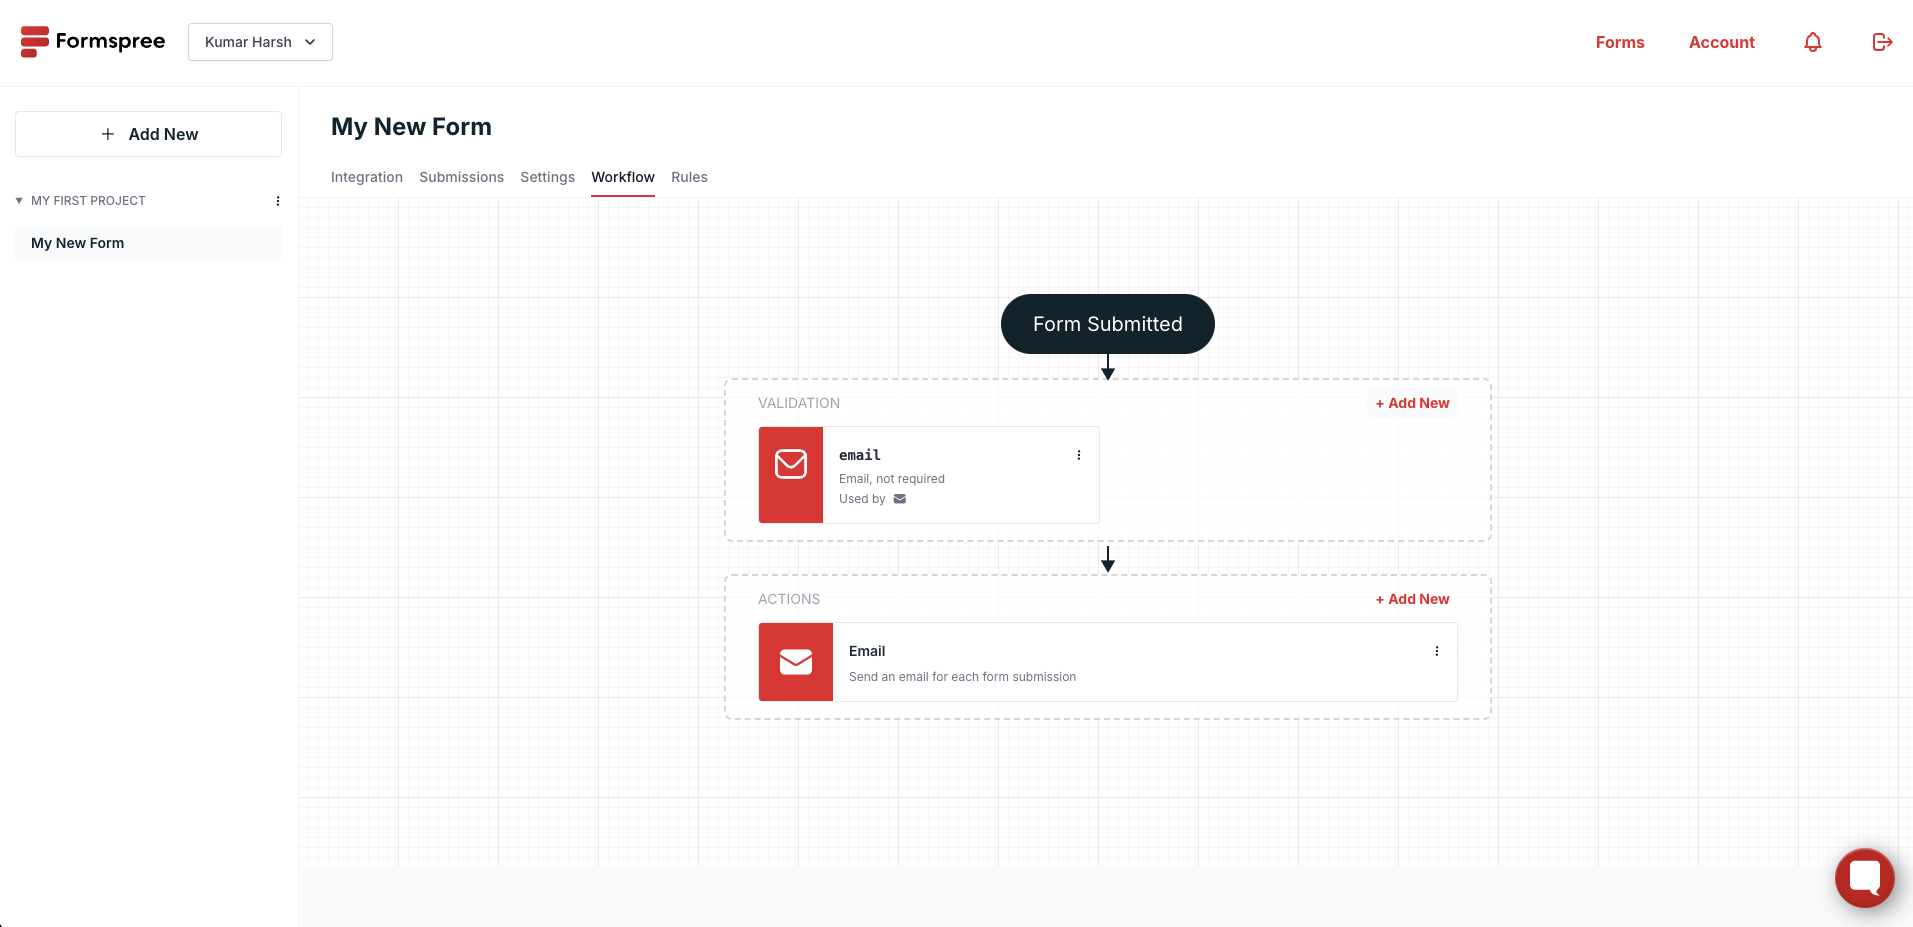
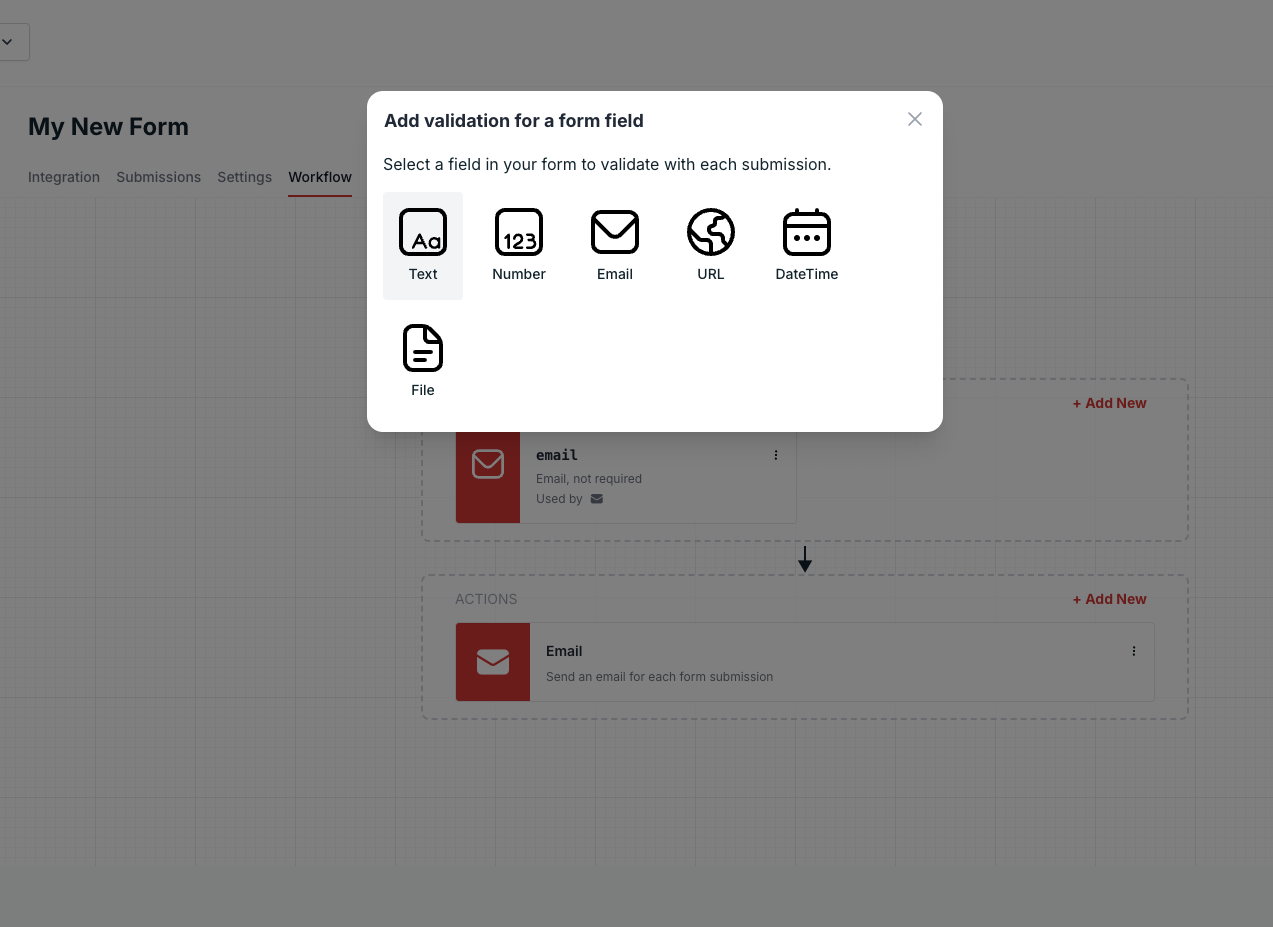
You will need to add another form field to this form by clicking on the + Add New button at the top right corner of the validations section. Select Text for the field type:
And provide your field with the name “name”, a maximum length, say 4, and make it required:
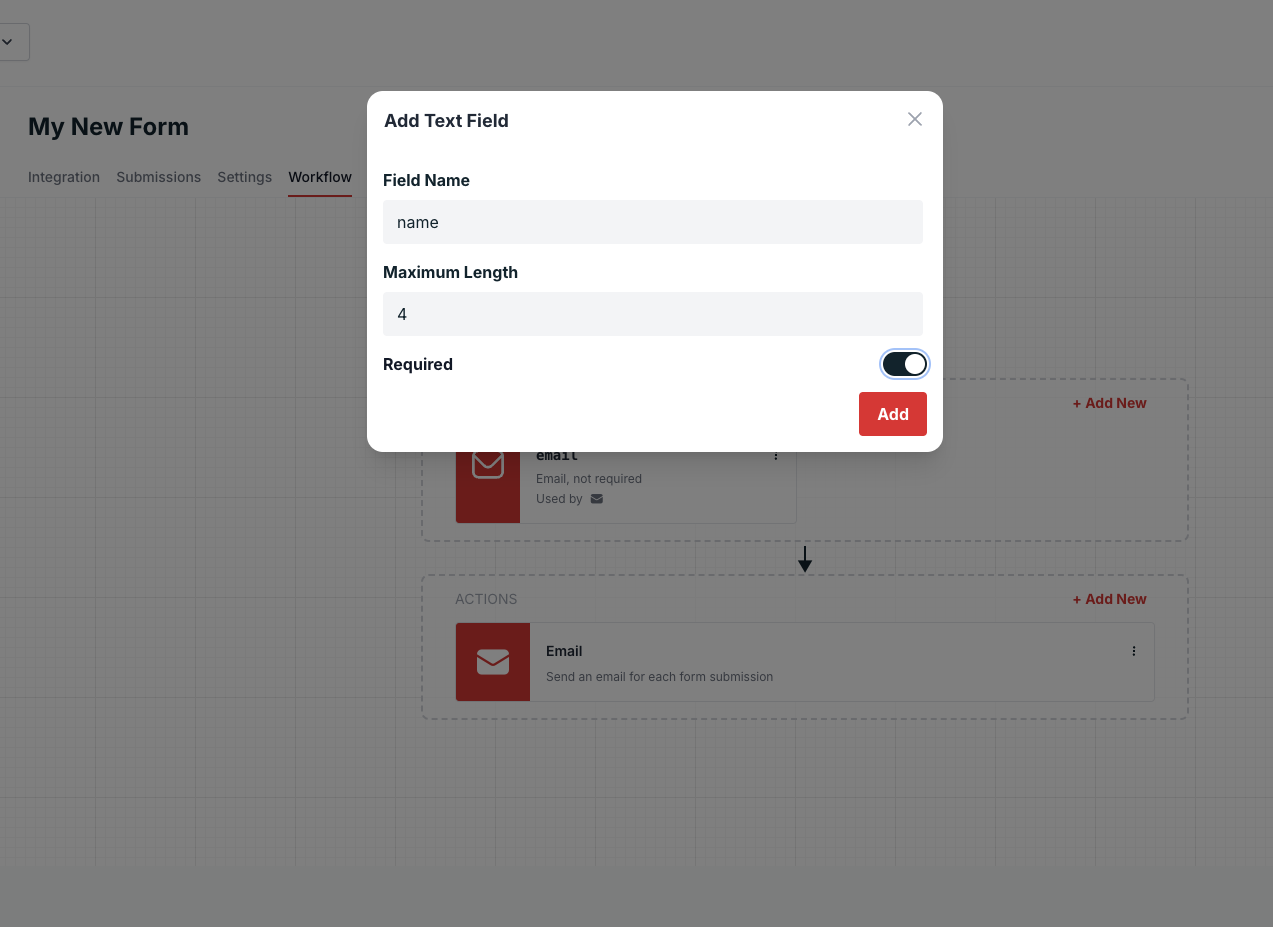
The 4 characters limit here is only for demonstration. In reality, you would want a more practical value for the max name length.
Once you click on the Add button, here’s what the workflows page will look like:
Now, switch to the integration tab and copy the form ID. You’ll need it to submit responses to your form.
Now that Formspree is setup, update the JS code snippet in the <script> tag of your HTML file to replace it with the following content:
  <script>
    let validator = {}
    const submitHandler = function (form) {
        // Clear previous server errors
        $(".error").remove();

        // Submit the form via AJAX
        $.ajax({
            url: "https://formspree.io/f/YOUR_FORM_ID",
            method: "POST",
            data: $(form).serialize(),
            dataType: 'json',
            success: function (response) {
                // Handle successful submission (optional)
                alert("Thank you for your submission!");
                form.reset();
            },
            error: function (xhr) {
                // Display server-side validation errors
                if (xhr.responseJSON && xhr.responseJSON.errors) {
                    $.each(xhr.responseJSON.errors, function (index, error) {
                        switch (error.field) {
                            case "name": validator.showErrors({ "name": "Name " + error.message });
                            break;
                            case "email": validator.showErrors({ "email": error.message })
                            break;
                        }
                    });
                } else {
                    alert("An unexpected error occurred.");
                }
            }
        });
    }
    $(document).ready(function () {
        validator = $("#myForm").validate({
            rules: {
                email: {
                    required: true,
                    email: true
                },
            },
            messages: {
                email: {
                    required: "Please enter your email",
                    email: "Please enter a valid email address"
                },
            },
            submitHandler
        });
    });
  </script>
This code creates a variable validator to retain a reference to the jQuery validator instance after you call the validate() function. It then defines a handler method that submits the form via AJAX and in the error handler function, it uses the validator variable to show server side errors through the validator.showErrors({}) function. This ensures that the server side error gets displayed through the same error labels that are used by jQuery Validate.
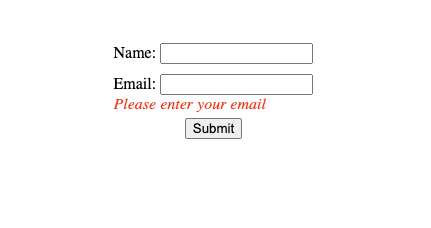
Now before the user clicks “submit”, they may see a client side error like this:
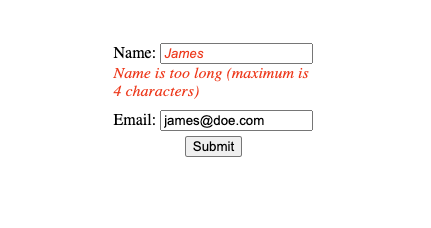
Once the user submits, here’s what a potential server-side error generated by Formspree would look like:
Best Practices for Using jQuery Validate
Now that you understand how to get started with jQuery Validate, here are a few best practices you can use to get the most out of it:
Clear and Concise Error Messages
Providing clear and concise validation error messages is very important for effective form validation. Your users should quickly understand what went wrong and how to correct their input. To do that, you should avoid technical jargon and use simple, user-friendly language. For example, instead of saying “Invalid input format,” specify the issue: “Please enter a valid email address.” Customizing error messages in jQuery validation is straightforward using the messages property, allowing you to create specific and helpful feedback for each validation rule.
Unobtrusive Styling
Error messages should be integrated into the form design to maintain a pleasant user experience. You should avoid intrusive alerts or pop-ups that can disrupt the user’s interaction with the form. Instead, place error messages close to the corresponding input fields, using CSS to style them unobtrusively. You can customize the appearance of error messages and highlight invalid form fields using the jQuery validation plugin’s error placement options and CSS classes. Consider using CSS frameworks like Bootstrap or custom styles to ensure a consistent and aesthetically pleasing look across your application.
Accessibility Considerations
Ensuring that your form validation is accessible to all users, including those with disabilities, goes a long way in building an inclusive experience for your users. Use appropriate ARIA (Accessible Rich Internet Applications) attributes to enhance the accessibility of your forms. For example, the aria-describedby attribute can link an input element to its corresponding error message, allowing screen readers to convey validation errors effectively. Semantic HTML elements, such as <label> and <fieldset>, also play a vital role in making forms accessible. jQuery validation supports these attributes, enabling you to create forms that are both user-friendly and compliant with accessibility standards.
Internationalization
In a globalized web, providing localized error messages is important for user satisfaction. The jQuery validate plugin includes built-in support for multiple languages, making it easy to internationalize your form validation. You can load language files provided by the plugin or create your own to cater to specific locales. Localized error messages enhance the user experience by delivering feedback in the user’s preferred language, improving comprehension, and reducing errors.
Server-Side Validation as a Backup
While the jQuery Validate plugin offers powerful client-side validation, it should never be the only layer of validation in your application. Client-side validation can be bypassed by users with malicious intent or unexpected scenarios. You should always implement server-side validation to ensure data integrity and security. Server-side validation catches any invalid data that may have slipped through the client-side checks. This layered approach to validation ensures robust protection against data corruption and security threats.
Final Thoughts
Form validation with jQuery Validate enhances the functionality and user experience of your web applications. The library’s extensive validation methods, customization options, and integration with jQuery make it a powerful tool for developers. By following best practices, such as providing clear error messages, unobtrusive styling, and ensuring accessibility, you can create effective and user-friendly validation systems.
Additionally, incorporating server-side validation ensures robust data integrity and security. Embracing jQuery Validate not only simplifies the validation process but also helps build a smoother, more reliable user experience. As you implement these techniques, explore the plugin’s comprehensive documentation and continue experimenting with its features to fully explore its capabilities.