Mastering Email Validation in JavaScript: Techniques and Best Practices
Learn various ways in which email validation can be implemented and know some key points to keep in mind when implementing email validation in any situation.

Email validation might seem like a small detail in the grand scheme of web development, but it holds the potential to turn everyday forms into reliable data sources, where every captured email address is accurate, secure, and ready to deliver results.
In this article, we’re going to explore email validation in JavaScript. We’ll look at different techniques, from the no-nonsense regex to the HTML5 built-ins, and even bring in some heavy-duty JavaScript libraries for those who need to go the extra mile.
Methods of Email Validation in JavaScript
When it comes to JavaScript email validation, several methods are available, each suited to different needs. In the next sections, we’ll dive into these, from simple regex matching to HTML5’s built-in validation and popular JavaScript libraries.
Basic String Matching with Regular Expressions
Regular expressions (regex) are one of the most straightforward methods for validating email addresses in JavaScript. A regex is a sequence of characters that define a search pattern, and it can be used to identify whether a string, like an email address, fits a specific format.
A simple example of a regular expression pattern for basic email validation might look like this:
const emailRegex = /^[^\s@]+@[^\s@]+\.[^\s@]+$/;
This regex pattern checks that the input string contains a valid structure: text before the @ symbol, a domain name after the @, and a period followed by the domain extension. While this covers many valid emails, it’s important to recognize that regex can’t capture every possible valid email format. Some valid addresses might be filtered out (such as those with subdomains), and some fake email addresses might pass (such as those with non-sensical domain names).
The advantage of using regex is its simplicity and efficiency. It’s easy to implement and doesn’t require any external libraries. However, the downside is that regex-based validation might be too rigid or too lenient, depending on the complexity of the pattern used. This method might not account for edge cases like subdomains, internationalized domain names, or unusual characters.
While regex can be a good starting point, it’s often best paired with additional validation methods or more complex patterns to ensure comprehensive coverage. For example, the above regex will permit some “email addresses” with infinitely long TLDs like “.co.uk.any.thing.goes” at the end. However, the complexity required to cover all the edge cases is truly daunting. Check out this thread for some truly impressive examples.
HTML5 Built-in Validation
HTML5 introduced built-in form validation features that make email validation much easier, without needing to write complex JavaScript or regex patterns. By simply adding the type="email" attribute to an email input field, you can leverage the browser’s native validation functionality.
Here’s a basic example in an HTML form:
  <form id="emailForm">
      <input type="email" name="email" placeholder="Enter your email" required>
      <button type="submit">Submit</button>
  </form>
In this example, the type="email" attribute tells the browser to automatically check that the input value resembles an email address format before allowing the form to be submitted. If the user enters an invalid email, the browser will display a built-in error message, preventing the form from being submitted until the error is corrected.
Here’s how it would work if you try submitting the form without providing an email address:
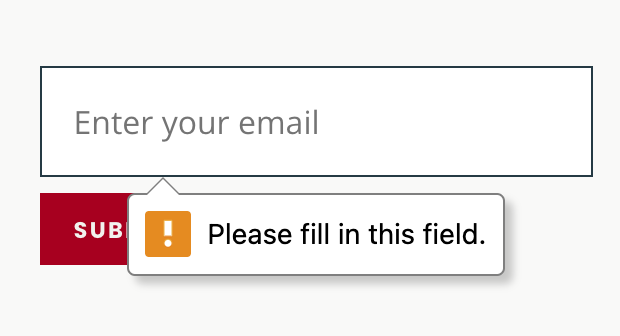
One of the biggest advantages of using HTML5’s built-in validation is its simplicity. There’s no need to write custom JavaScript; the browser handles everything for you. It also provides instant feedback to users, which improves the overall user experience by letting them know right away if their input is incorrect. Moreover, HTML5 validation works consistently across modern browsers, meaning you don’t have to worry about cross-browser compatibility. The browser’s native validation messages are also localized, automatically adapting to the user’s language settings, which enhances accessibility.
However, HTML5 validation is far from perfect. While it does a good job of catching basic format errors, it doesn’t validate the existence of the domain or filter out fake email addresses. It also might not catch edge cases, such as unusual characters in the local part of the email or internationalized domain names.
Using JavaScript Libraries
For developers looking to implement more secure and flexible email validation, JavaScript libraries offer a powerful alternative to basic regex or HTML5’s built-in validation. Libraries like Validator.js and Yup are popular choices that provide a complete set of tools for form validation, including email address checks.
Validator.js
Validator.js is a lightweight, dependency-free library that simplifies the process of validating various types of input, including email addresses on both server and browser environments. It offers a pre-built isEmail() method that you can use right out of the box:
  const validator = require('validator');

  if (validator.isEmail(emailInput)) {
      console.log('Valid email!');
  } else {
      console.log('Invalid email!');
  }
This method is more secure than a basic regular expression, handling a wider range of edge cases and ensuring that the email format is correct. Validator.js is particularly useful in server-side environments or for developers who want a straightforward solution without having to write custom validation logic.
Yup
Yup is another powerful library, particularly popular in the React ecosystem. It allows you to define complex validation schemas that can handle various data types, including emails. Here’s how you might use Yup for email validation in a React form:
  import * as Yup from 'yup';

  const validationSchema = Yup.object().shape({
      email: Yup.string()
          .email('Invalid email format')
          .required('Email is required'),
  });

  validationSchema.validate({ email: emailInput })
      .then(() => console.log('Valid email!'))
      .catch(err => console.log(err.errors));
Yup’s email() method not only checks the format of the email but also allows you to customize error messages, making it a great choice for creating user-friendly forms.
Using libraries like Validator.js and Yup offers several advantages over manual methods. They provide more reliable validation by covering a broader range of edge cases and offer additional features like customizable error messages and integration with popular frameworks. This makes them ideal for developers who need a scalable, maintainable solution for form validation, particularly in larger projects or production environments.
Some Considerations for Email Validation
When implementing javascript email validation, a few key factors must be considered to ensure that your approach is both user-friendly and secure.
- User Experience: A good validation process should balance strictness and flexibility. Overly rigid validation can frustrate users, especially if it rejects valid but uncommon email addresses. Instant feedback is crucial—users should know right away if their email is accepted or if there’s an issue that needs fixing. Providing clear, helpful error messages can improve the overall user experience, guiding them smoothly through the form submission process.
- Security Concerns: Email validation isn’t just about catching typos; it’s also a frontline defense against security threats. Proper validation helps prevent injection attacks, where malicious input could compromise your system. It’s also important to remember that client-side validation alone isn’t enough—always validate emails on the server side to ensure security against any attempts to bypass your client-side checks (more on this in the next section!)
- Handling Edge Cases: Email validation must account for a wide variety of edge cases. Some common challenges include accommodating subdomains (
user@mail.company.com), allowing unusual characters (firstname.lastname+alias@domain.com), and supporting internationalized domain names (user@bücher.com). Additionally, ensuring your validation logic can handle long top-level domains (TLDs) like.photographyand catching missing domain extensions (user@domain) are important considerations. - Filtering for Professional Emails: To ensure that your app collects only work-related email addresses, you should consider adding an extra layer of validation that excludes common email providers like Gmail, Yahoo, and Outlook. To do this, you need to check the domain of the email address after you’ve completed the basic validation and compare it with a list of common free email providers. If the domain matches one of these providers, prompt the user to provide a work email instead.
- Performance Considerations: Finally, efficient validation is key to maintaining form performance, especially in applications with complex forms or high traffic. Optimize your validation logic to minimize any impact on user experience while ensuring accuracy
Automating Email Validation With Formspree
Are you thinking of implementing email validation on your form? Formspree can help by handling email validation on the backend, making it incredibly easy to ensure that only valid email addresses make it through.
With just a few steps, you can set up your form to automatically validate emails. Here’s how to do it:
1. Create Your Form in HTML
First, you need to set up a simple form in your HTML. Here’s a basic example:
  <form id="myForm" action="https://formspree.io/f/{your_form_id}" method="POST">
      <input type="email" name="email" placeholder="Enter your email" required>
      <button type="submit">Submit</button>
  </form>
This form includes an input field for the user to enter their email address and a submit button. The required attribute ensures that the form won’t submit without an email address, and the type="email" attribute triggers the browser’s built-in email validation.
2. Create a New Form on Formspree
See that {your_form_id} in the action attribute of the form? You will need to generate that and plug it in after creating a new form on Formspree. And this is where you will set up your validation rules.
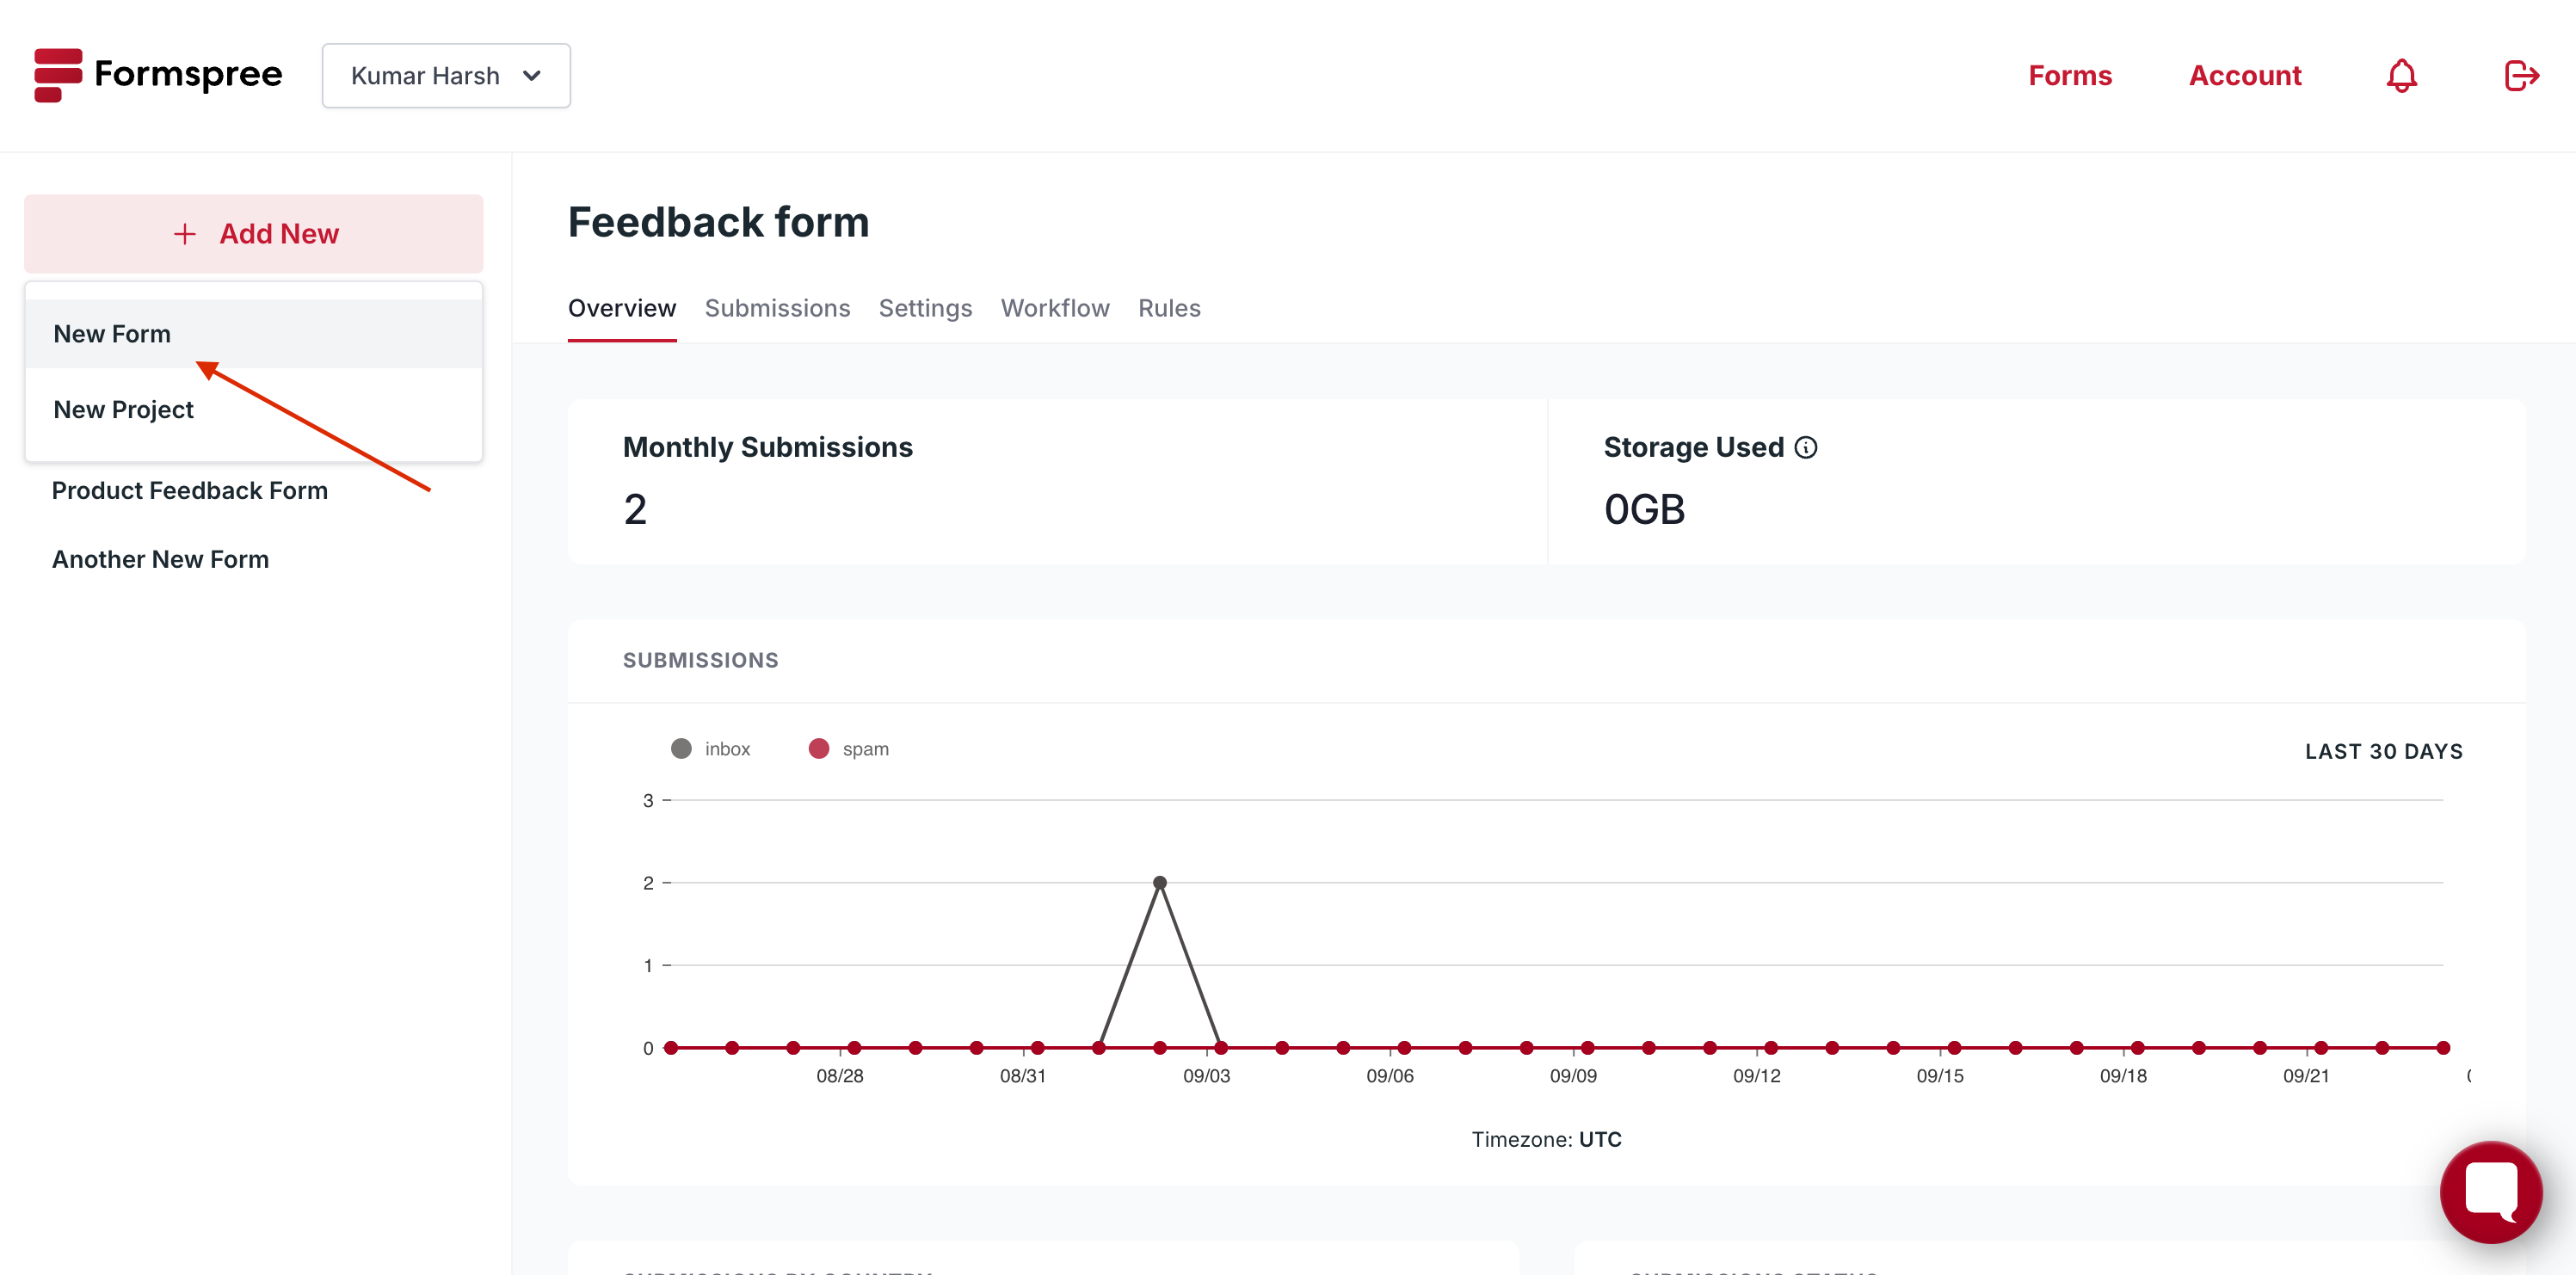
To get started, go to the Formspree dashboard and click on the + Add New button at the top left.

In the dropdown that opens, select New Form.
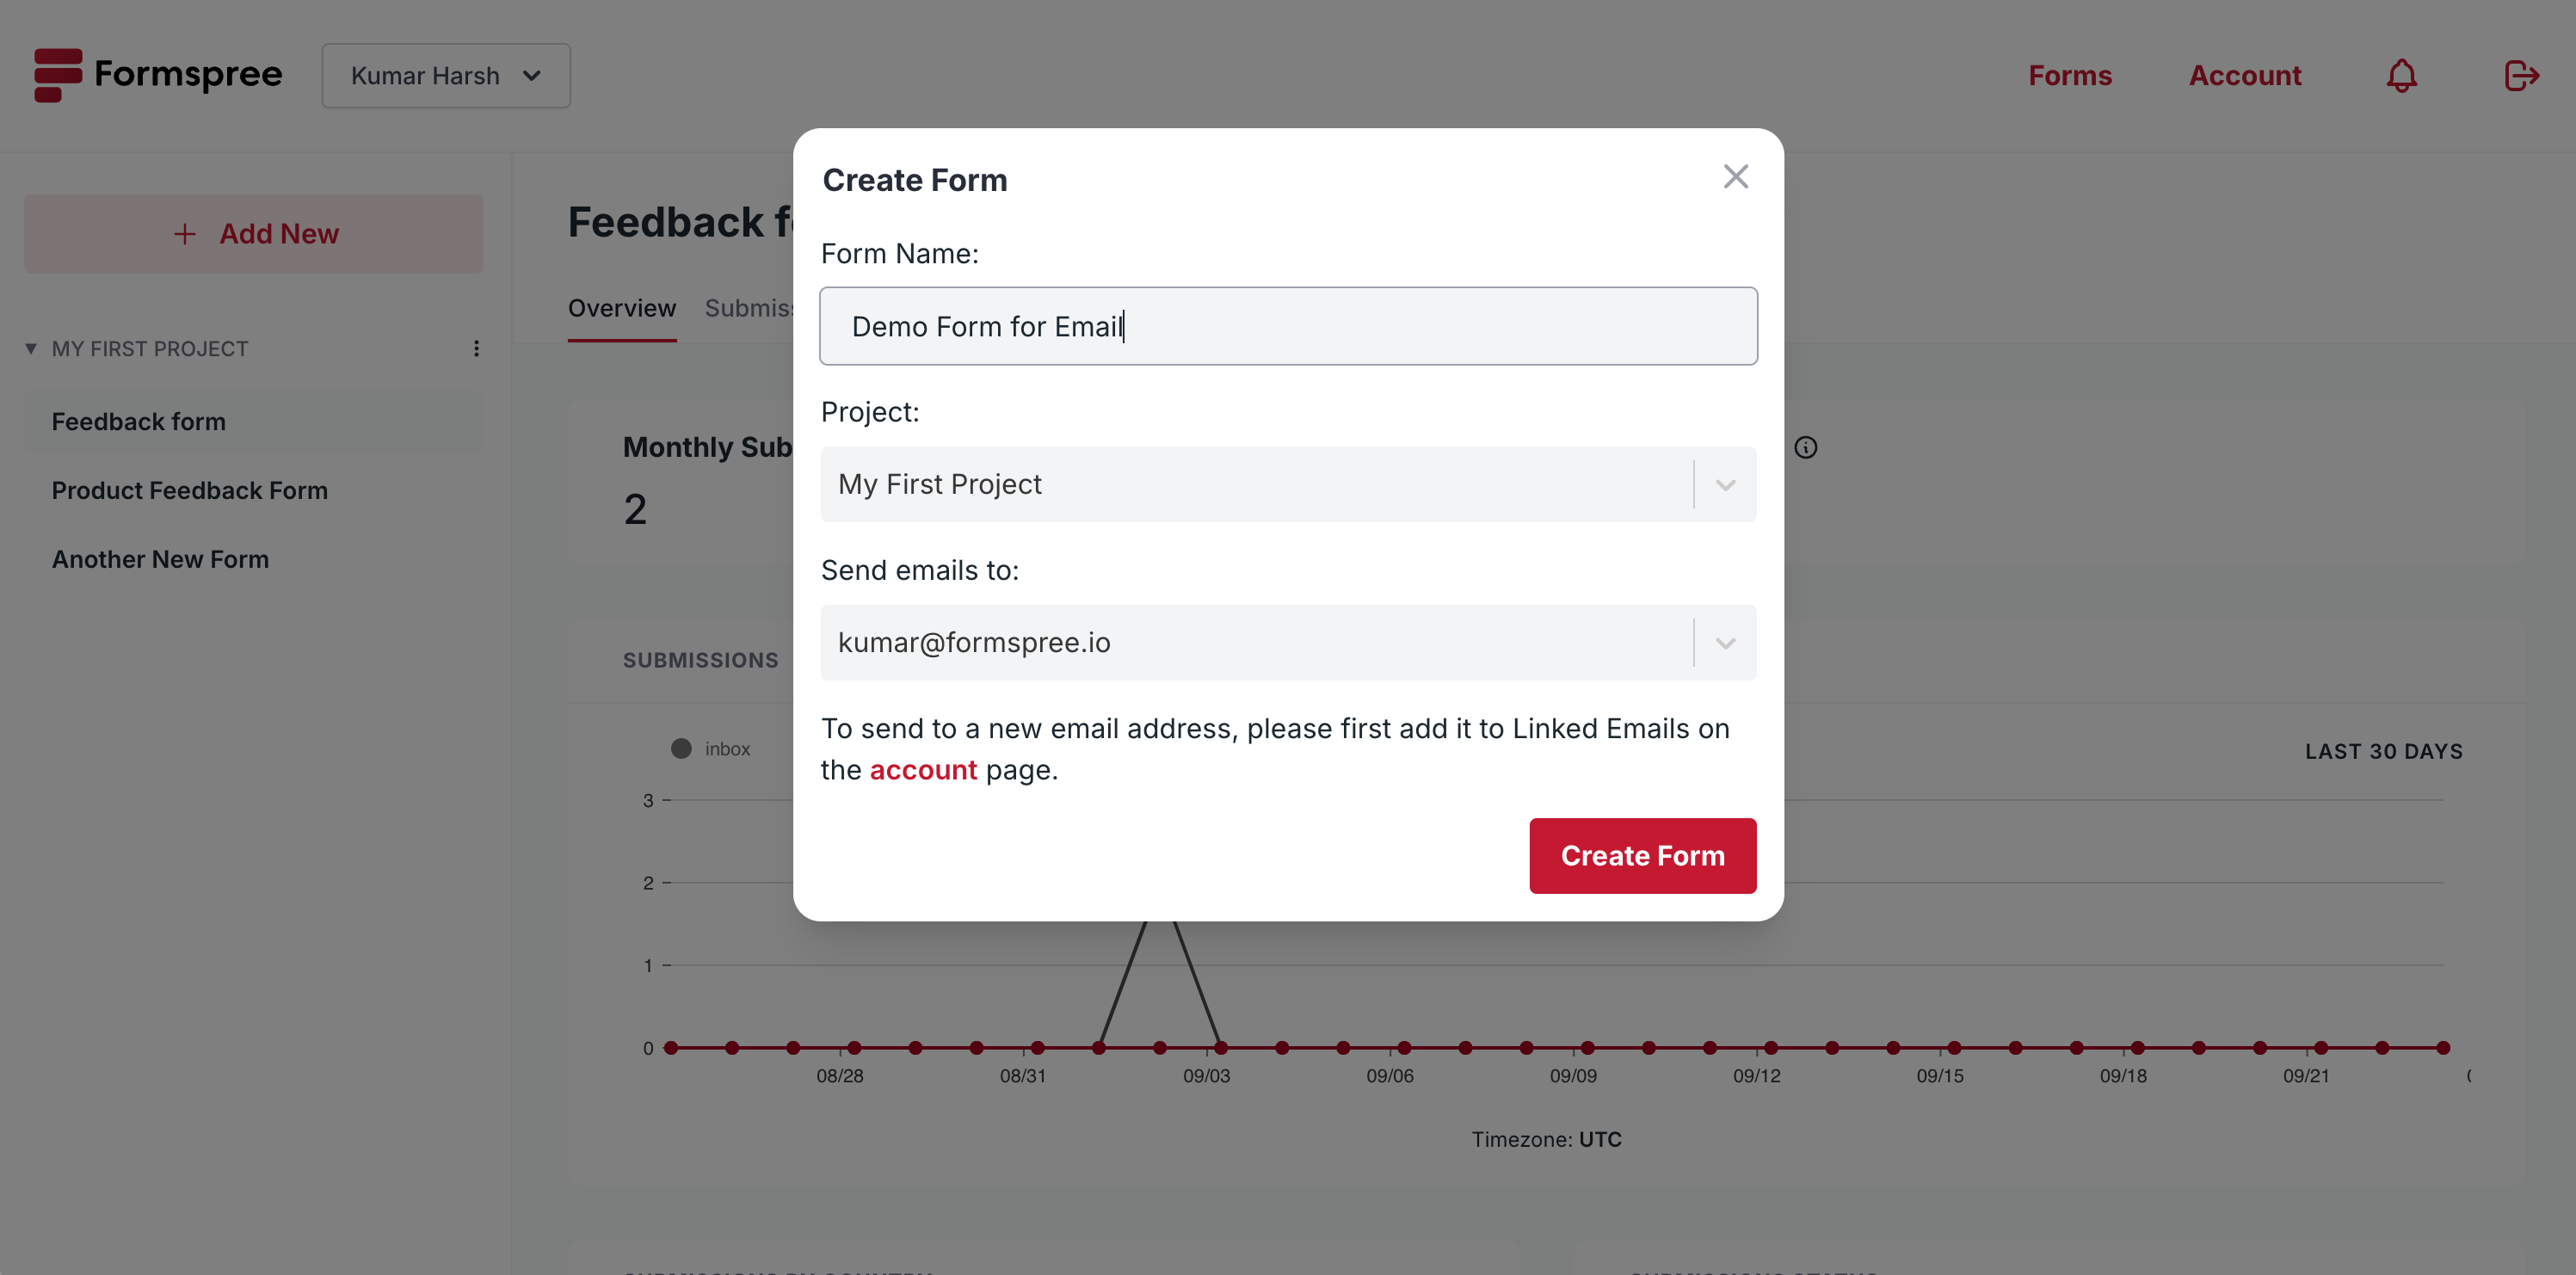
A dialog will popup asking you to set a name for your new form and choose the project that it is a part of. Fill in the details and click on the Create Form button at the bottom right.
Once the form is created, you will be able to see the form ID on the Integration tab.
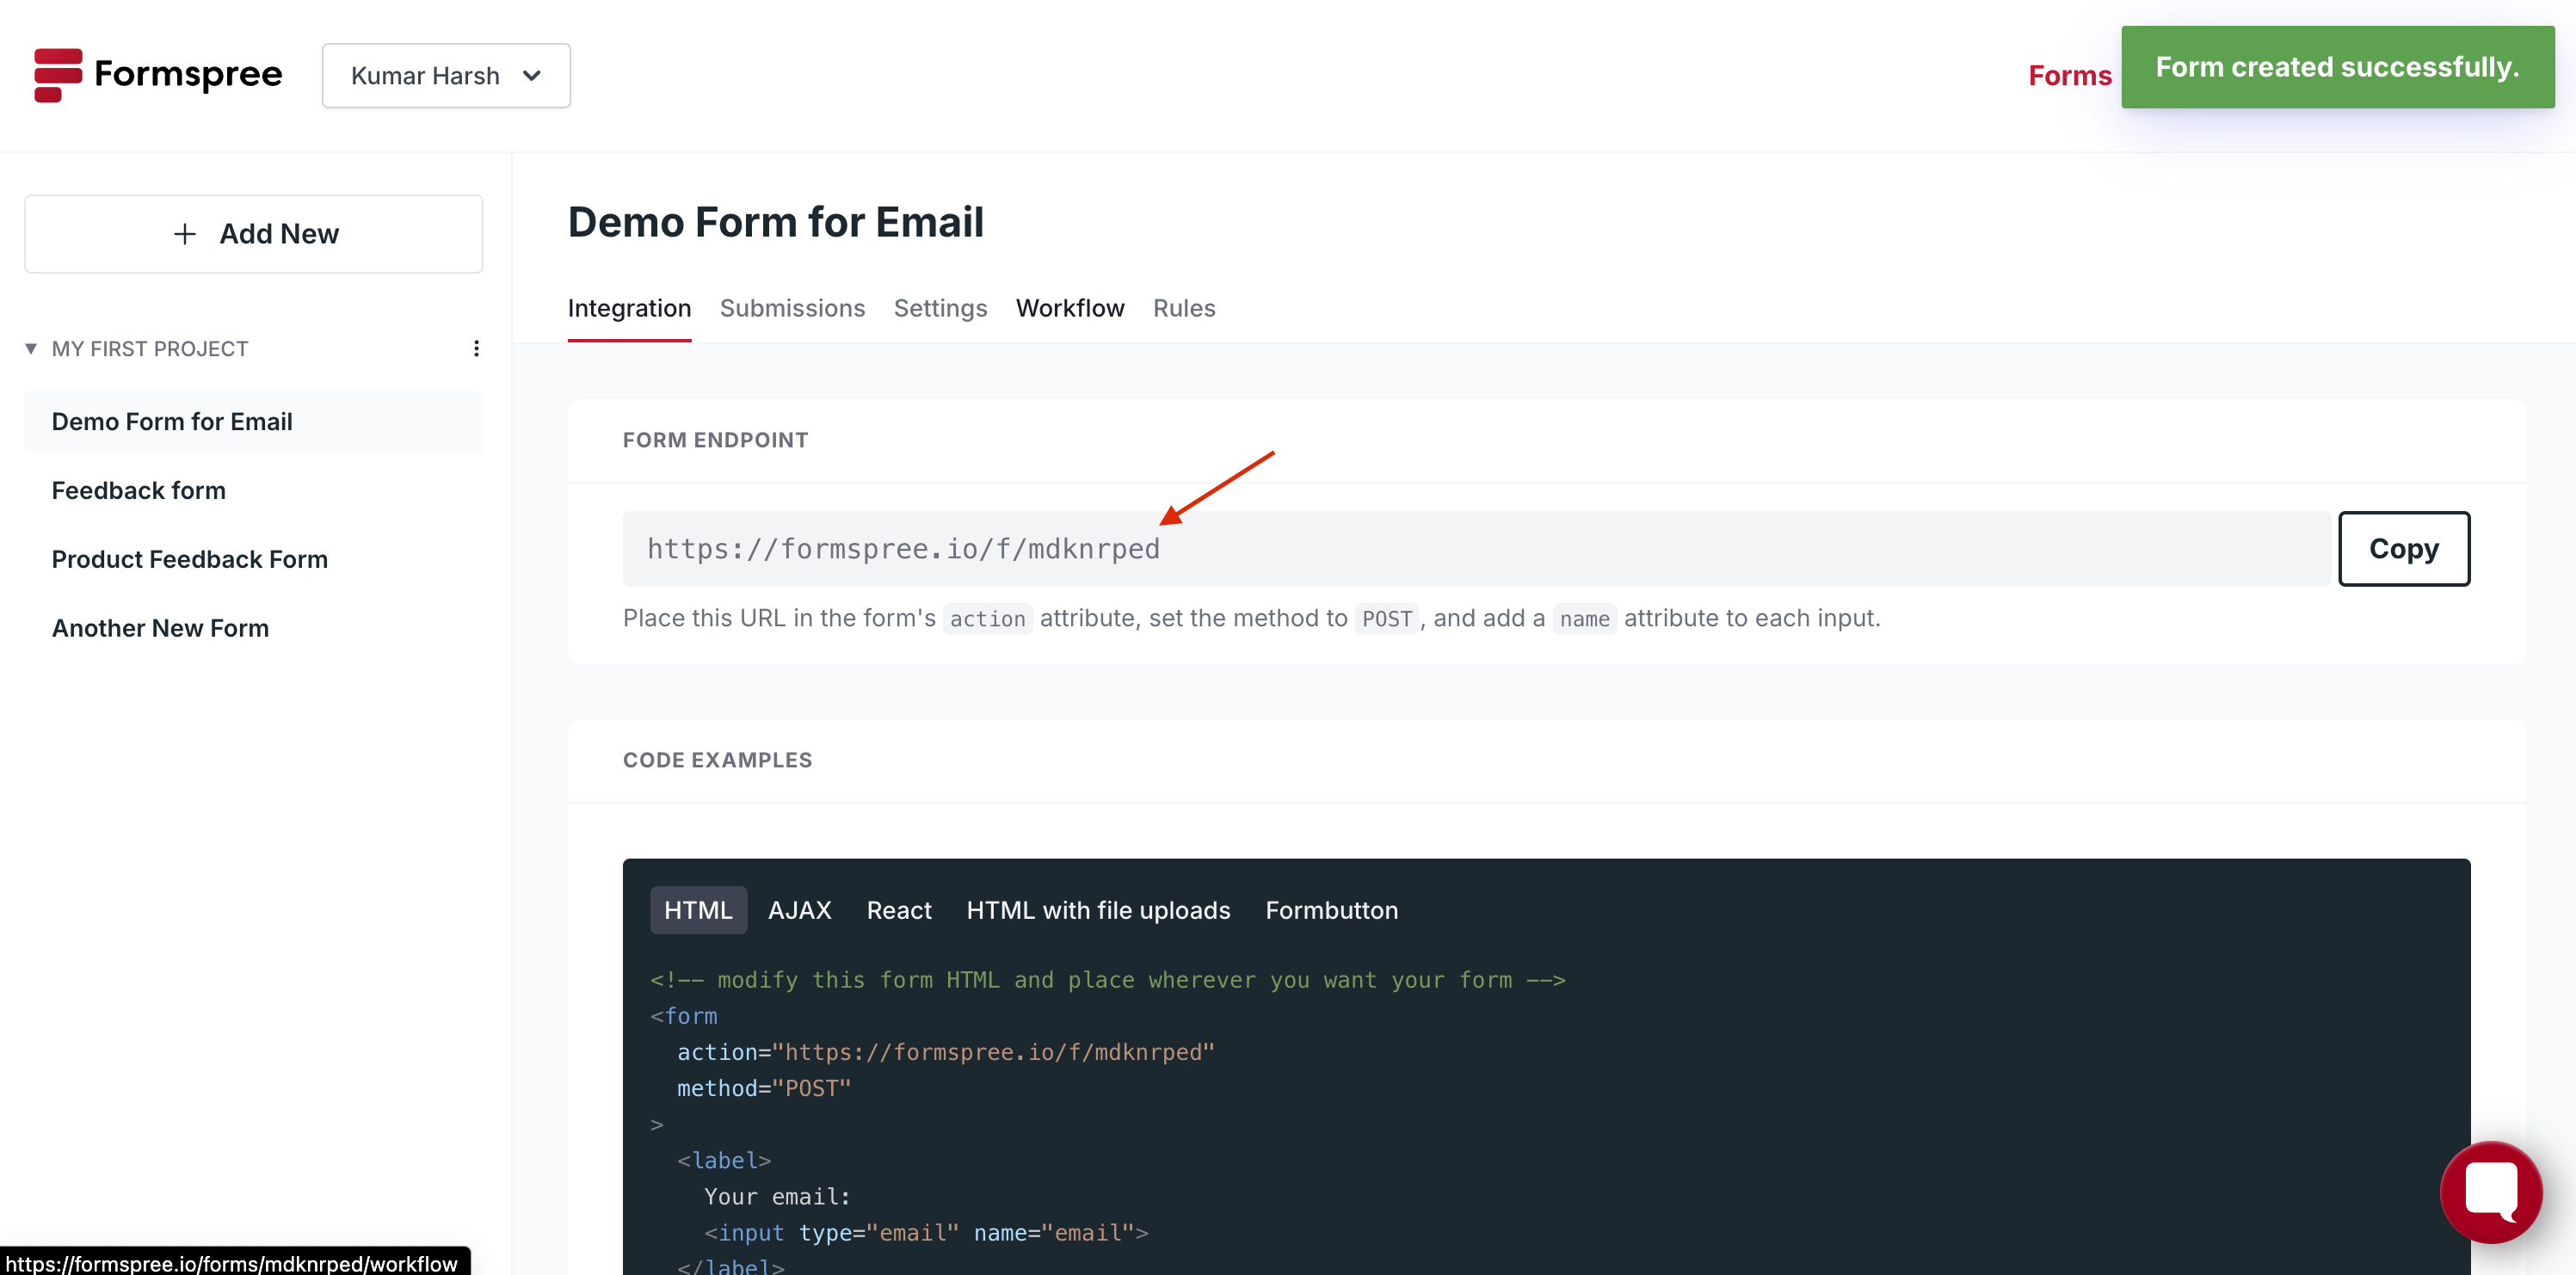
Copy this and replace the {your-form-id} text in your HTML code with it. If you go to the Workflow tab, you will be able to set up server-side validation for your form.
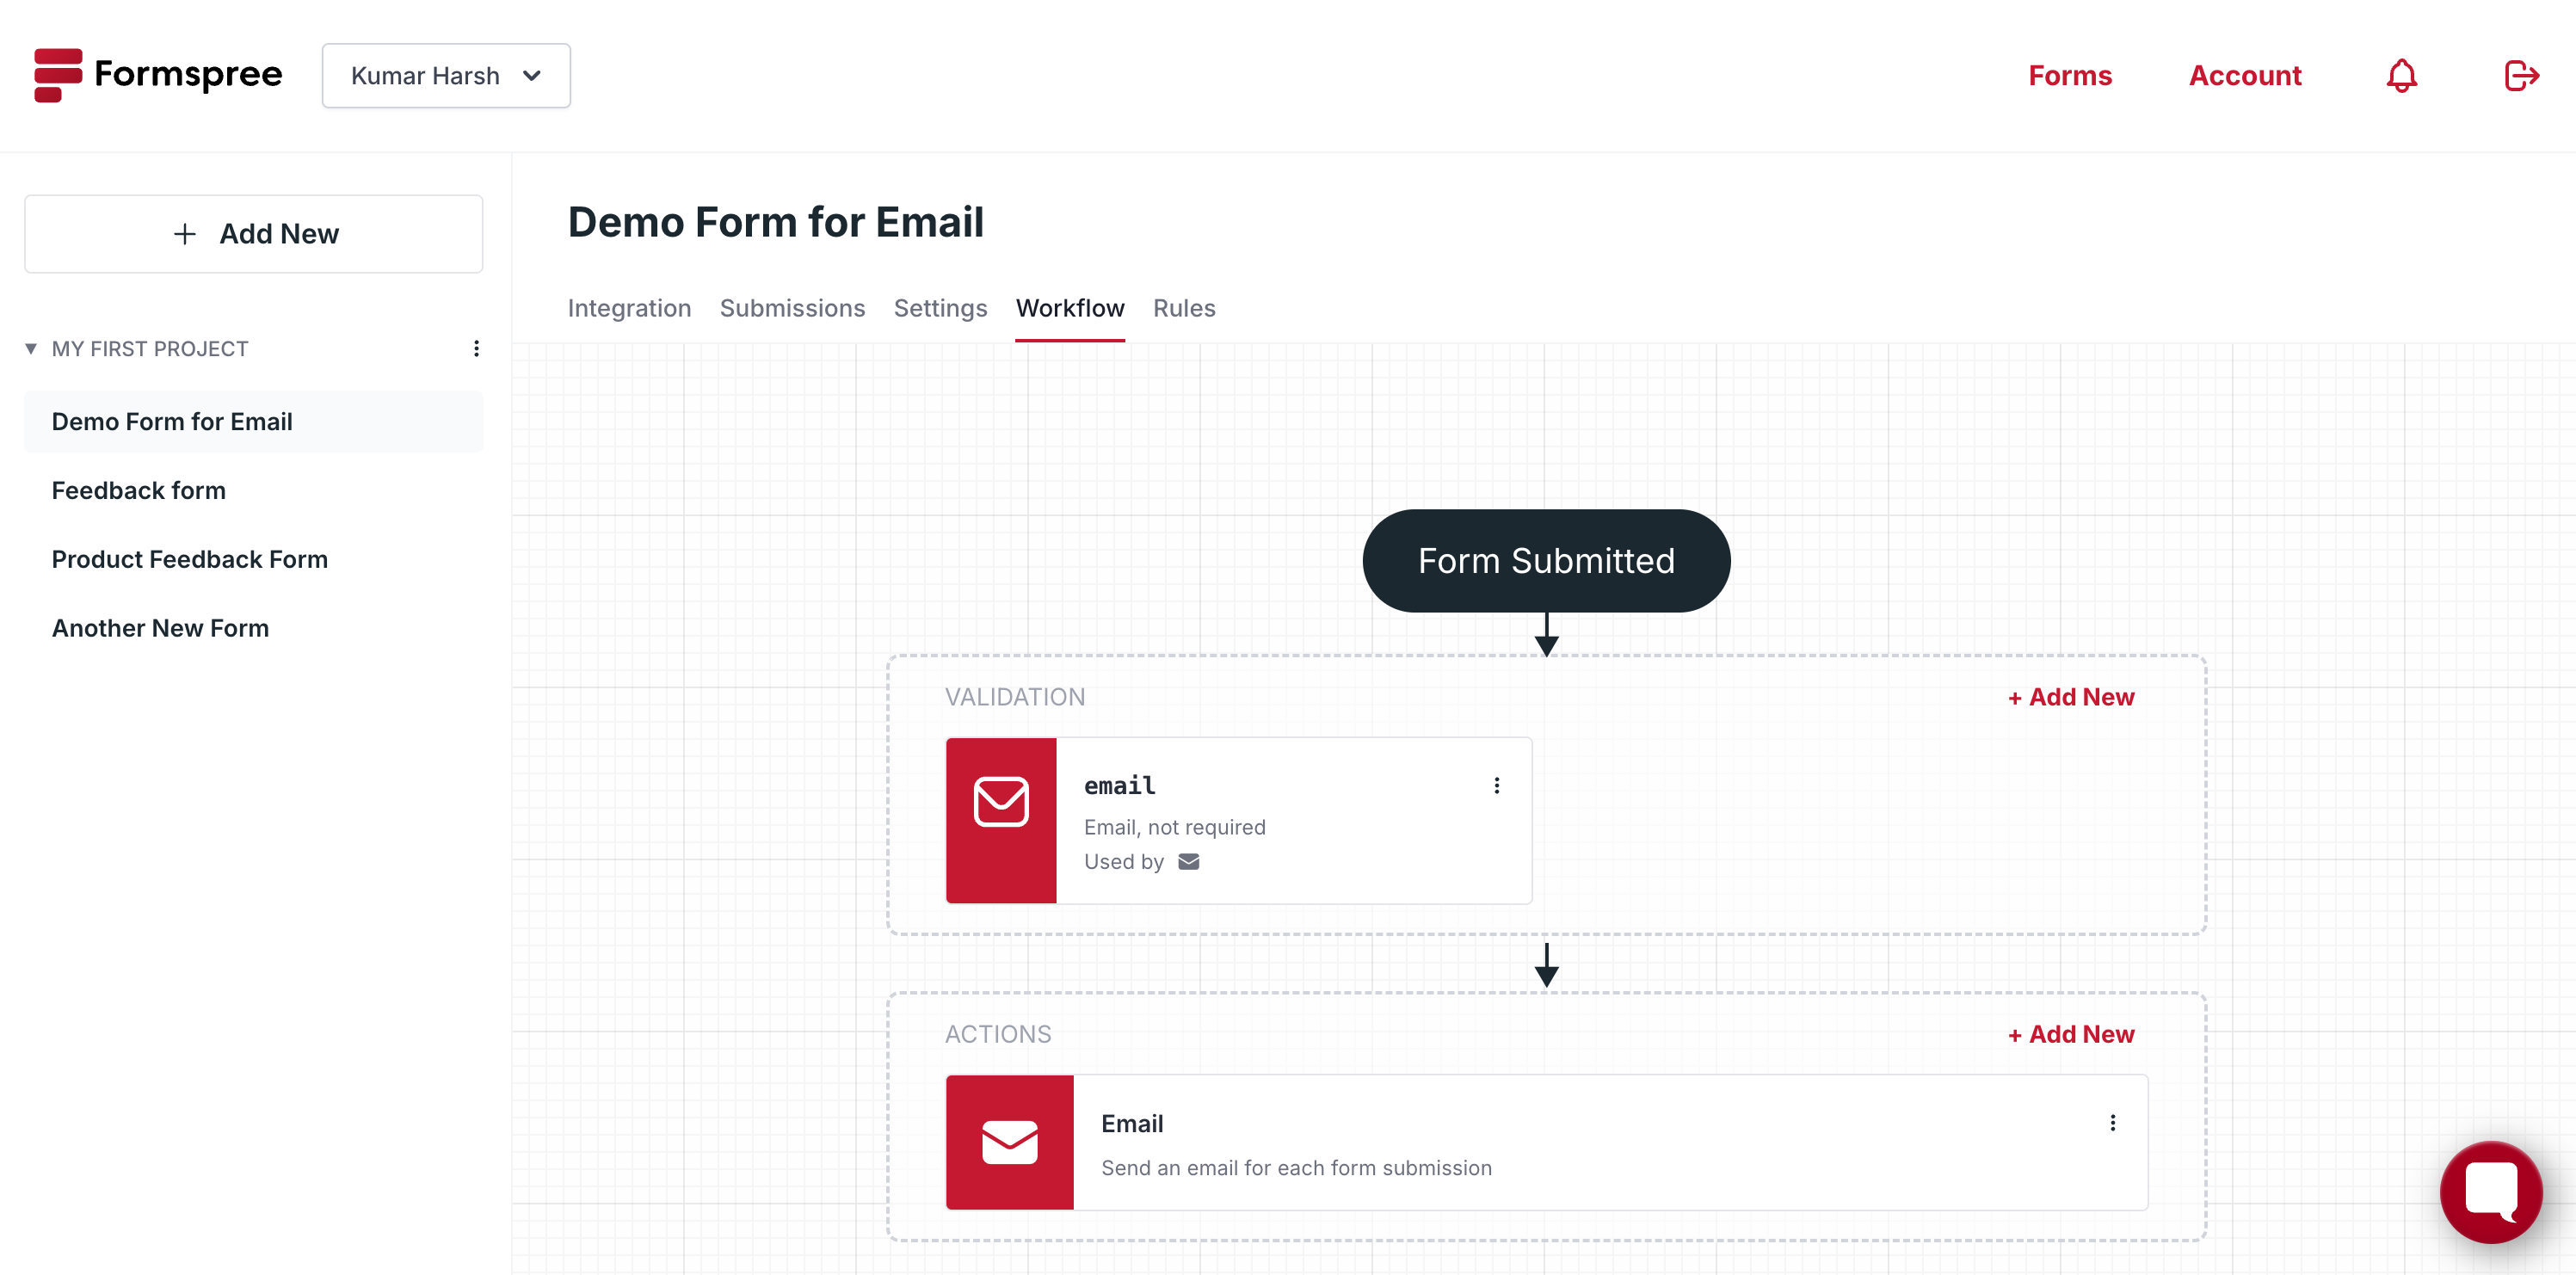
You will see that a validation rule for an email field has been automatically created and added to the validations section of the workflow. So, any data that you pass to this form in a field named “email” will be treated as an email address and validated automatically. You can choose to make this field mandatory, or add more validation rules using this tab.
3. Set Up AJAX Submission
To handle form submissions asynchronously and capture the validation results, you can use AJAX. This approach allows the form to be submitted without refreshing the page. Here’s how you can set it up using JavaScript:
  document.getElementById('myForm').addEventListener('submit', function(e) {
      e.preventDefault();
      const formData = new FormData(this);

      fetch(this.action, {
          method: 'POST',
          body: formData,
          headers: {
              'Accept': 'application/json'
          }
      }).then(response => {
          if (response.ok) {
              alert('Success! Your email is valid.');
          } else {
              return response.json().then(data => {
                  if (data.errors?[0]) {
                      alert('Error: ' + data.errors[0].message);
                  } else {
                      alert('Oops! Something went wrong.');
                  }
              });
          }
      });
  });
This script prevents the default form submission behavior and instead submits the form data via AJAX. The fetch function sends the form data to Formspree’s backend, which then handles the email validation for you.
4. Parse the Error Result
If the email validation fails, Formspree’s backend will return an error response. The JavaScript code above checks for this response and alerts the user with the specific error message, helping them correct their input:
  if (data.errors && data.errors[0]) {
      alert('Error: ' + data.errors[0].message);
  } else {
      alert('Oops! Something went wrong.');
  }
Here’s how it would work:
With this setup, you’ve automated email validation in your forms, using Formspree to do the heavy lifting. This not only simplifies your code but also provides a more secure validation process, ensuring that only valid emails get through even if somebody tries to get around the browser’s built-in validation.
Ready to simplify your email validation process? With Formspree, you can effortlessly handle validation on the backend, saving time and reducing complexity. Start using Formspree today to ensure that every email your forms collect is valid and secure—no extra coding needed!